If you have spent time working through base coating, washing, layering, and cel-shading, you might be wondering why your figure still does not have the visual punch you see on professional figure repaints. The answer is almost always edge highlighting, which finishes the figure.
Where cel-shading places the shadows, edge highlighting places the brightest points — the sharpest corners, the outermost ridges, the highest peaks of every form. It is what makes a Vegeta figure feel like it could actually be lit by an overhead studio light. It is what makes Goku's hair feel like it is catching a beam of sunlight.
Table of Contents:
- What is figure edge highlighting?
- Why edge highlighting transforms a repaint?
- Tools you need for edge highlighting
- Edge highlighting vs other highlighting techniques
- Step-by-step edge highlighting process
- How to apply edge highlights cleanly?
- Examples of edge highlighting in practice
- Common mistakes to avoid
- Edge highlighting different surface types
- Frequently asked questions
What is Figure Edge Highlighting?
ANSWER: Figure edge highlighting is the technique of applying a lighter version of the base colour to the sharpest edges, corners, and raised ridges of a figure to simulate the way light catches on three-dimensional surfaces.
Why the technique works:
- Light naturally catches strongest on sharp edges and corners, not flat surfaces
- Surface angles that change dramatically reflect more light to the viewer's eye
- Replicating this on a figure produces a result that feels three-dimensional and lit
- The figure stops looking like flat coloured plastic and starts looking like a sculpted, lit object
How edge highlighting fits with other stages:
- Shadows (from washing and cel-shading) define the lower, recessed areas
- Mid-tones (from base coating and layering) fill the middle surfaces
- Edge highlights claim the highest, sharpest points
What edge highlighting delivers:
- Sharper definition of the figure's silhouette from any distance
- Clear visual separation between forms and surfaces
- The "lit object" quality that separates collector-level work from amateur results
- The final tonal element that completes a fully painted figure
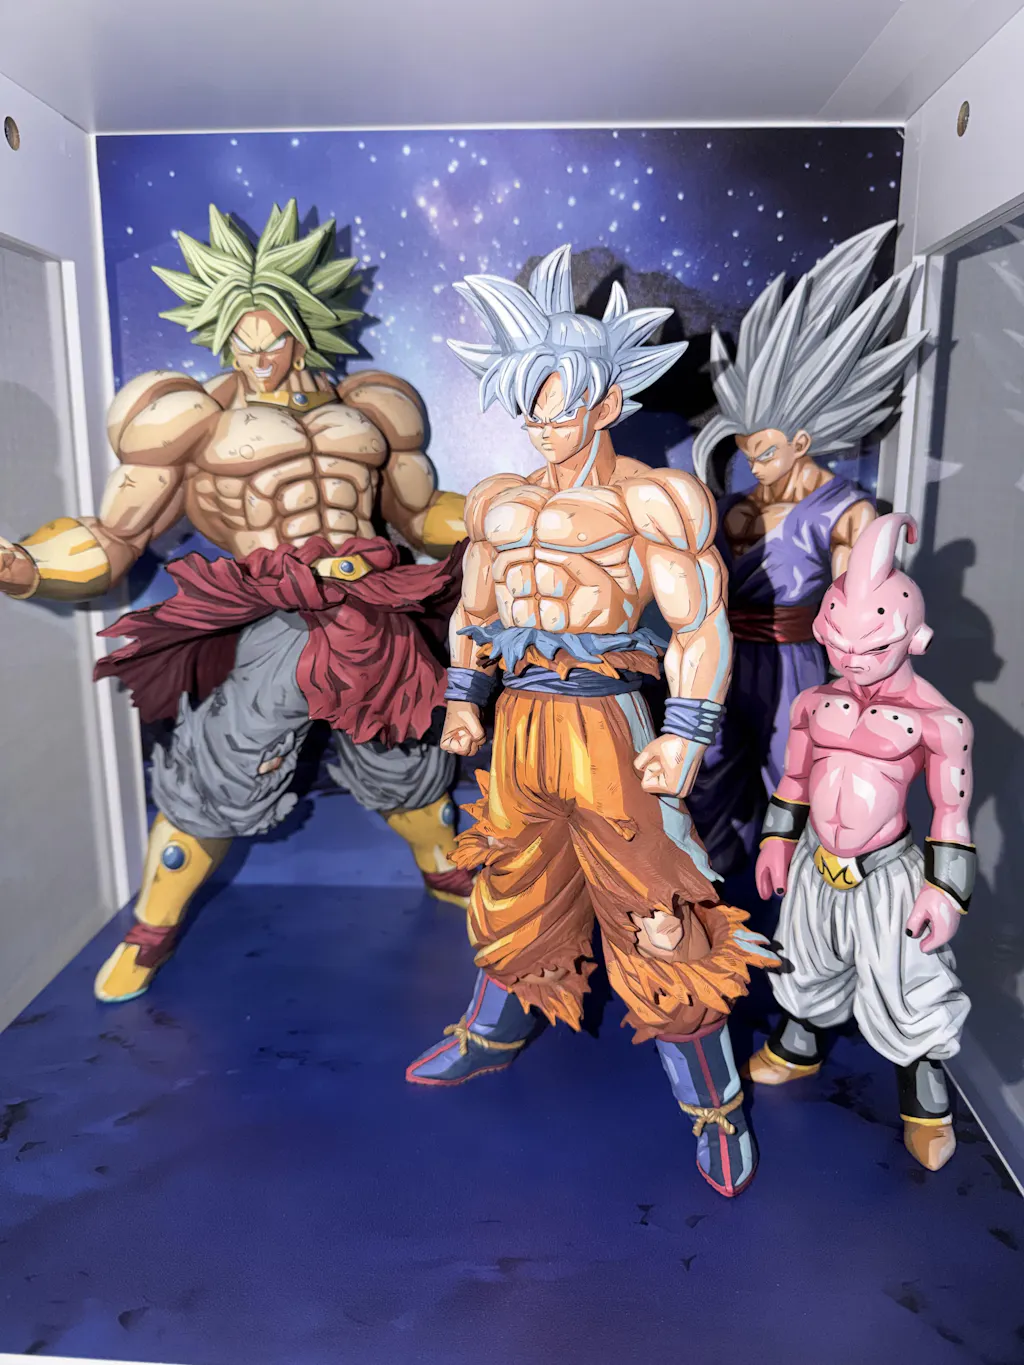
For Dragon Ball figures specifically, edge highlighting is what gives the bold, illustrated quality of the source material its three-dimensional finish. Sharp edge highlights along armour panels, hair spikes, and muscle ridges give the figure the same visual punch that anime line work delivers on screen.

Why Edge Highlighting Transforms a Repaint?
There are three reasons figure edge highlighting deserves the time it takes to do properly.
1. It defines the silhouette of the figure
The outermost edges of a figure are what determine how the piece reads from a distance. Sharp, defined edge highlights make the silhouette pop against any background. Without them, the figure visually melts into its surroundings.
2. It creates the final tonal range
A repaint with shadows, mid-tones, and highlights reads as a fully lit object. A repaint missing any of those three elements always feels unfinished. Edge highlighting completes the range.
3. It signals craft and intention
Edge highlighting is one of the most clearly visible signs that a miniature figure has been painted with deliberate care. Collectors recognise it immediately, and it is one of the techniques that most strongly contributes to the perception of professional quality.
For a beginner working through the eight core figure painting techniques, edge highlighting is the technique that delivers the most dramatic visible upgrade for the work already done. The figure goes from "looks pretty good" to "looks genuinely premium" in a single stage.
Tools You Need for Edge Highlighting
Edge highlighting demands the most precision of any brush technique in figure painting, and the tools reflect that.
Essential tools:
| Tool | Purpose | Recommended |
|---|---|---|
| Fine detail brush | Primary edge highlighting work | Citadel S Layer, Winsor & Newton Series 7 size 0, Raphaël 8404 size 0 |
| Ultra-fine liner brush | Tightest edges and small details | Citadel XS Artificer Layer, Rosemary & Co Series 33 size 00 |
| Wet palette | Consistent paint thinning | Redgrass Games Painter, Army Painter Wet Palette |
| Highlight paint | Lighter version of base colour | Same brand as base coat for colour consistency |
| Pure white | Final extreme highlights | Citadel White Scar, Vallejo Pure White |
| Two water pots | Clean water for thinning, dirty for cleaning | Any small containers |
| Paper towel | Brush moisture control | Lint-free preferred |
| Strong neutral lighting | Precision visibility | Daylight LED minimum 1,000 lumens |
Practical recommendations:
- Brush quality matters more here than at any other stage. A worn brush that has lost its tip cannot produce the clean line edge highlighting requires
- Reserve dedicated edge highlighting brushes and protect them carefully — these brushes do precision work and should never be used for base coating or washing
- A wet palette dramatically improves edge highlighting consistency. Mixed highlight tones stay workable across multiple sessions, which means consistent highlight tones across the whole figure
What to avoid:
- Synthetic brushes with stiff bristles; edge highlighting needs the springy, controlled flex of natural sable or sable-blend brushes for miniature painting.
- Pure white as a first edge highlight on most colours — it usually looks too stark. Build toward white through intermediate lighter tones
- Ultra-cheap detail brushes; edge highlighting is the one stage where brush quality genuinely matters
Edge Highlighting vs Other Highlighting Techniques
There are several highlighting techniques in figure painting, and understanding the differences helps you choose the right one for the right surface.
| Technique | What It Is | Best For | Avoid For |
|---|---|---|---|
| Edge highlighting | Lighter colour applied to sharpest edges and corners | Armour, hair spikes, muscle ridges, defined forms | Smooth gradient surfaces |
| Layered highlighting | Progressively lighter colour applied to broader raised areas | Skin, smooth muscles, large flat surfaces | Sharp-edged geometric forms |
| Dry brushing | Almost-dry brush dragged across raised texture | Hair, fur, weathering effects, textured surfaces | Smooth surfaces, fine details |
| Wet blending | Wet paint blended on the figure for soft transitions | Skin, sky effects, smooth gradients | Anime-style sharp transitions |
| Glazing | Very thin transparent paint layered for subtle tone shifts | Skin tones, refining transitions | Bold contrast effects |
- For Dragon Ball repaints, edge highlighting is the dominant technique because the bold, illustrated style suits sharp transitions over soft blending.
- Layered highlighting plays a secondary role on skin and smooth muscle surfaces. Dry brushing supports hair and texture effects. Wet blending is rarely used because it works against the cel-shaded aesthetic.

Step-by-Step Edge Highlighting Process
This is the actual workflow from cel-shaded figure to fully edge-highlighted figure.
✅ Step 1: Confirm Cel-Shading Is Fully Dry
Edge highlighting goes on top of cel-shading and needs the previous stage fully dry before starting. A cel-shading layer that is still soft will lift when highlighted over. Wait at least an hour after the final cel-shading pass, ideally longer.
✅ Step 2: Plan Your Highlight Placement
Before mixing paint, identify exactly which edges and ridges will be highlighted.
Typical edge highlight targets on a Dragon Ball figure:
- Outer edges of shoulder armour
- Top ridges of chest armour panels
- Sharpest edges of belt and trim
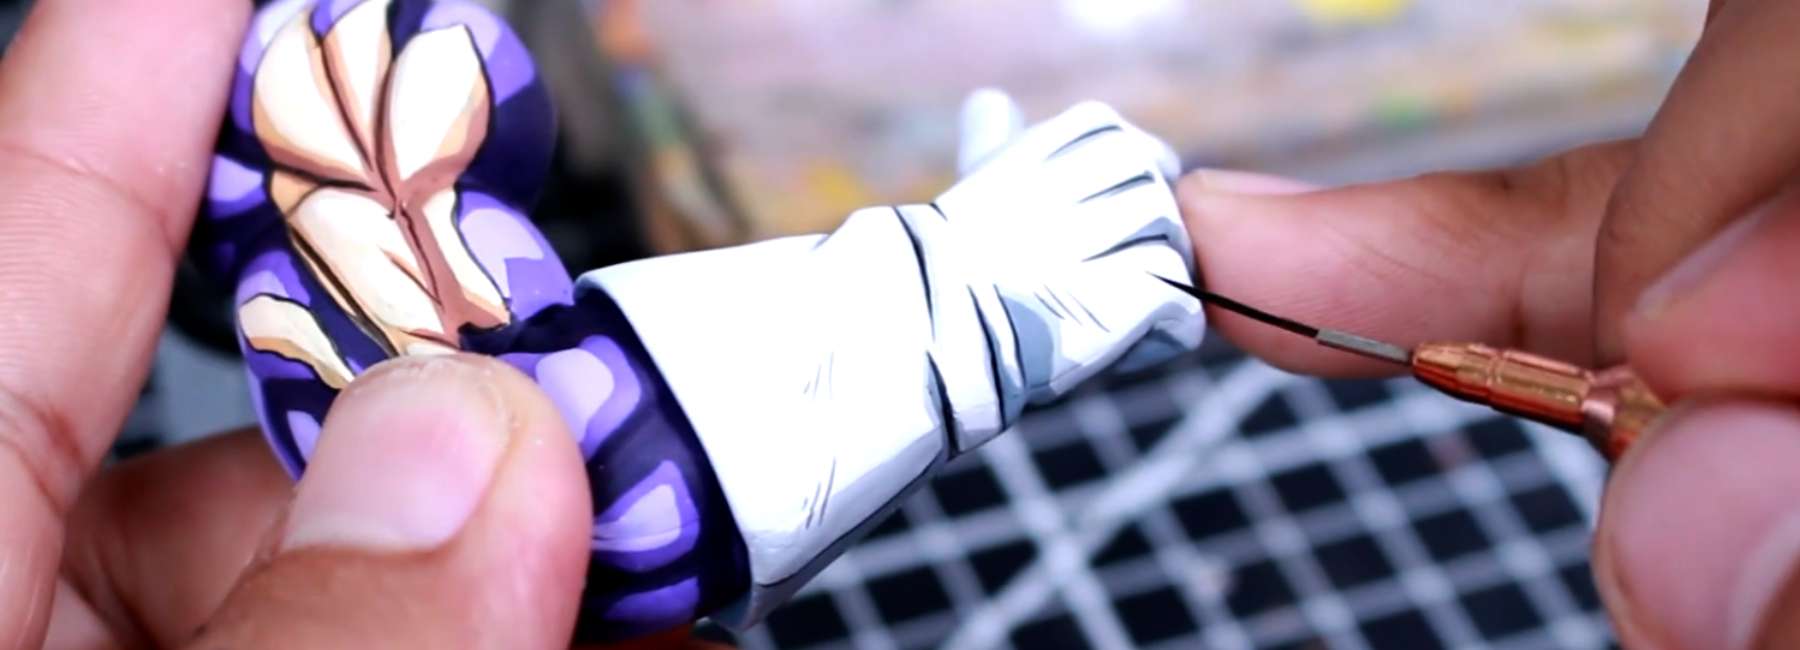
- Outer edges of glove cuffs
- Top edges of boots
- Highest ridges of hair spikes
- Top edges of muscle peaks (chest, biceps, thighs)
- Bridge of the nose, tops of cheekbones, chin tip
Plan for restraint. Edge highlighting should land on the sharpest edges, not every raised surface.
✅ Step 3: Mix Your First Highlight Colour
The first edge highlight is a lighter version of the base colour, not a dramatic jump to white. A typical starting ratio is 70% base colour, 30% white or a pale tone of the same colour family. Mix enough to last the session and keep the ratio consistent across all sessions for the same figure.
✅ Step 4: Mix Your Second (Brighter) Highlight Colour
A second, brighter highlight goes on top of the first to create the final highlight gradient. This second mix is typically 40% base, 60% white — or for the brightest accents, near-pure white with just a touch of the base colour to keep tonal warmth.
✅ Step 5: Apply the First Edge Highlight
- Load the brush very lightly with thinned highlight paint and wipe excess on the paper towel
- The brush should feel almost dry
- Apply the highlight with the side of the brush tip dragged along the edge
- Use a single confident stroke per edge — back-and-forth motion thickens the line and ruins the crisp quality
- The first highlight covers the full length of each chosen edge, establishing the highlight gradient
✅ Step 6: Apply the Second (Brighter) Edge Highlight
The second, brighter highlight covers a smaller area within the first.
- Apply the brighter mix only to the sharpest points of each edge — corner peaks, the tip of a hair spike, the highest point of an armour ridge
- The brighter highlight should cover roughly half the length of the first highlight or less
✅ Step 7: Add Final Spot Highlights Where Needed
For the most dramatic accents, a tiny spot of near-pure white can be added at the very sharpest corners. These final spot highlights should be used sparingly. Three or four well-placed spot highlights across the whole figure deliver more impact than ten scattered ones.
✅ Step 8: Inspect Under Strong Light
Once dry, examine the figure under your strongest, most neutral light from multiple angles.
A correctly edge-highlighted figure should show:
- Sharp, defined highlight lines along chosen edges
- Clear gradient from base colour to first highlight to brighter highlight
- Bold visual punch from a normal display distance
- No fuzzy or blurred highlight lines
- No overdone areas where every edge has been highlighted equally
Any soft or weak highlights can be sharpened with a second targeted pass.
How to Apply Edge Highlights Cleanly
The physical technique of placing a clean edge highlight is what determines whether the technique works or fails.
1. Anchor your brush hand
Edge highlighting demands the steadiest hand of any brush technique.
- Rest your wrist or fingers against the figure stand, your other hand, or the desk edge
- A brush hand floating in mid-air will produce shaky, fuzzy highlights
- An anchored hand produces clean, sharp lines
2. Use less paint than feels right
The brush should feel almost dry before it touches the figure. Excess paint thickens the highlight, blurs the edge, and ruins the precision. After loading, wipe firmly on the paper towel until very little paint remains visible on the bristles.
3. Drag the side of the brush along the edge
Edge highlighting uses the side of the brush tip dragged along the edge — not the very point, and not pressed into the surface. The bristle naturally catches the edge as it passes, depositing a thin clean line. This is the same physical motion as light steering a marble along a ruler edge.
4. Use single confident strokes
- One stroke per edge
- Back-and-forth motion thickens the line, blurs the transition, and creates uneven coverage
- If a stroke goes wrong, let it dry fully before correcting
- Wet correction makes everything worse
5. Highlight in the direction of the form
Each highlight stroke should follow the direction of the surface it sits on. Hair spike highlights run along the length of the spike. Armour edge highlights run along the panel edge. Muscle highlights run along the muscle direction. Cross-grain highlights look unnatural and break the illusion.
6. Step back regularly
Hold the figure at arm's length every few minutes. Edge highlighting is calibrated for display distance, not close inspection. A highlight that looks "too obvious" close up almost always looks just right at normal viewing range.
Practical tips:
- Work under your strongest, most neutral light throughout the session
- Take regular short breaks; edge highlighting fatigue produces shaky lines fast
- Keep your reference brush dry and clean; switch brushes immediately if the tip splits or fans
- Practise the dragging motion on a spare figure or test piece before applying it to a figure you care about
What beginners get wrong:
Trying to highlight every raised surface equally. Edge highlighting is a technique of restraint. The power comes from selecting the sharpest, most important edges and giving them definition. Highlighting everything dilutes the effect entirely.

Examples of Edge Highlighting in Practice
The examples below walk through edge highlighting decisions for the most common areas of a Vegeta figure repaint.
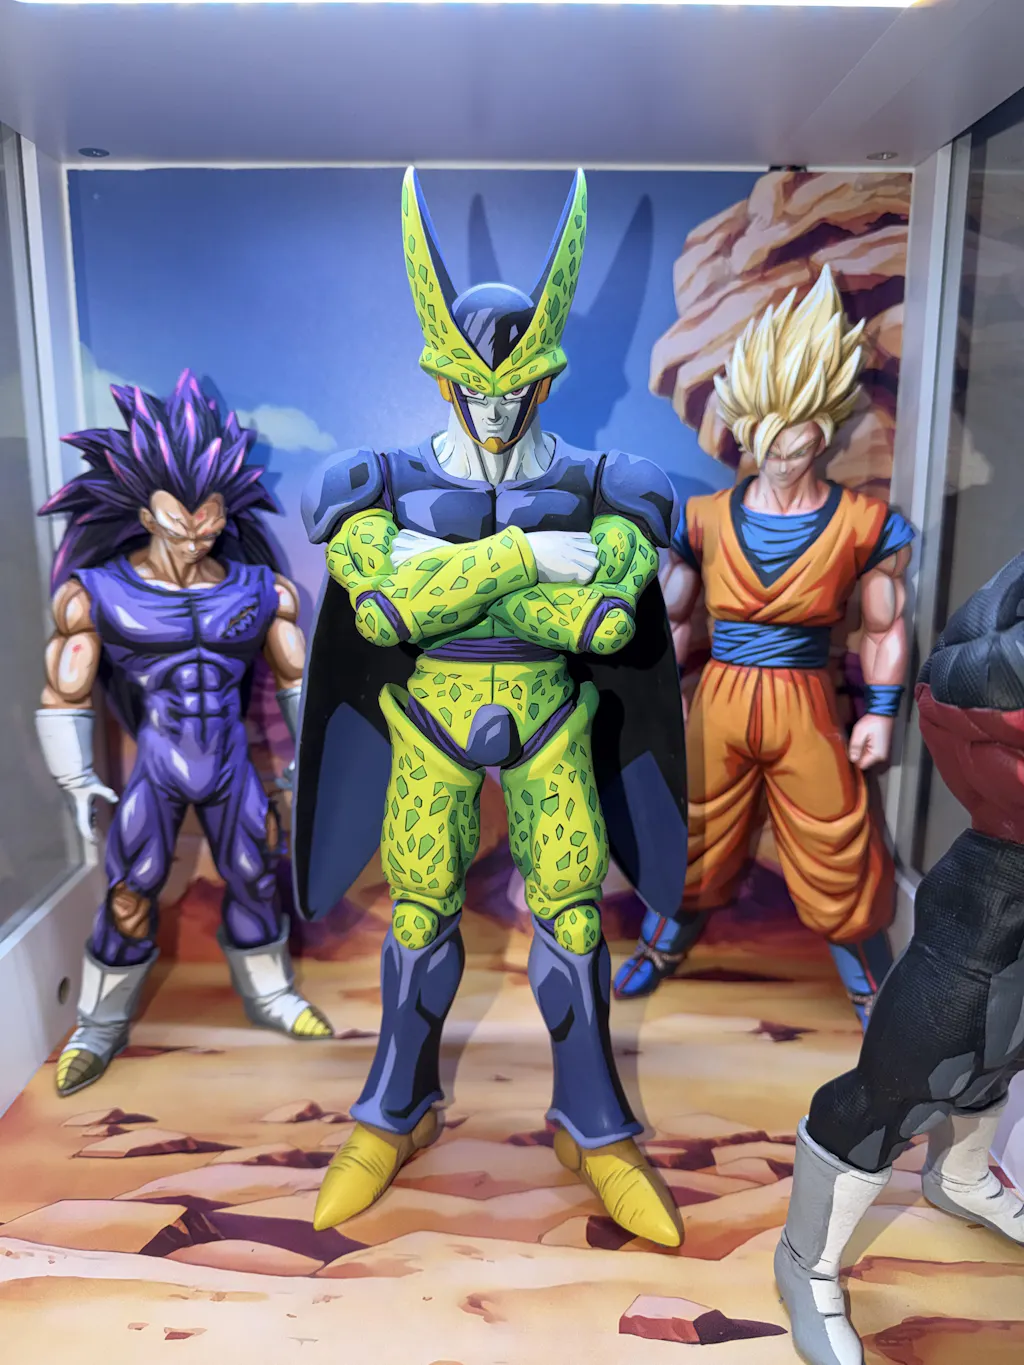
Example 1: Edge Highlighting Vegeta's Chest Armour
Chest armour is one of the most rewarding edge highlighting targets because the sharp sculpted edges show every clean highlight line.
- Starting point: Cel-shaded White Scar armour with cool grey shadows along the lower portion of each panel.
- First highlight: White Scar mixed with a touch of pale grey — almost pure white but slightly cooler. Applied along the top edge of each armour panel and along the outer edges where panels meet.
- Second highlight: Pure White Scar applied to the sharpest corners and the highest points of each panel.
RESULT: The armour reads as solid plate with sharp, defined edges. The highlights catch the eye immediately and give the chest piece the visual weight that makes it feel like real armour.
Example 2: Edge Highlighting Vegeta's Bodysuit
Bodysuit edge highlighting is more subtle than armour but adds significant definition to the figure's anatomy.
- Starting point: Cel-shaded Xereus Purple bodysuit with darker purple shadows along muscle valleys.
- First highlight: Xereus Purple mixed with Genestealer Purple (lighter purple) at roughly 60/40 ratio. Applied along the top ridges of muscles — chest peaks, bicep tops, thigh tops, calf ridges.
- Second highlight: Genestealer Purple mixed with a touch of white. Applied only to the very highest points — the absolute peak of the chest muscle, the top of the bicep, the front edge of the thigh.
RESULT: The bodysuit gains dimensional anatomy. The muscles now read as raised forms catching light from above rather than flat purple surfaces.
Example 3: Edge Highlighting Vegeta's Hair
Hair is one of the most important edge highlighting targets on any Dragon Ball figure because the sharp, segmented hair design depends on clear definition between strands.
- Starting point: Cel-shaded black hair with pure black shadows along the lower portion of each segment.
- First highlight: Dark grey (Abaddon Black mixed with Dawnstone) applied along the top edge of each hair segment.
- Second highlight: A lighter grey applied to the very tip of each hair spike and the sharpest ridges.
RESULT: The hair reads with the segmented, illustrated quality that defines anime hair. Each spike feels distinct, the silhouette sharpens dramatically, and the figure feels like a 2D drawing translated into three dimensions.
Example 4: Edge Highlighting Vegeta's Skin
Skin edge highlighting is subtle but essential for face definition.
- Starting point: Cel-shaded skin tone with warm shadows beneath the chin, in eye sockets, and along the underside of arms.
- First highlight: Base skin tone mixed with a small amount of Kislev Flesh or pale skin tone. Applied to the bridge of the nose, the tops of the cheekbones, the chin, the forehead, and the upper lip.
- Second highlight: A slightly lighter mix applied to the very tip of the nose, the highest point of each cheekbone, and a small spot at the centre of the forehead.
RESULT: The face gains sculpted dimension. The features now catch light deliberately, giving the figure expressive depth and preparing the surface for face detailing.
Example 5: Edge Highlighting Vegeta's Gold Chest Detail
The gold V-piece is small but visually central, and edge highlighting gives it the metallic sharpness it needs.
- Starting point: Cel-shaded Retributor Armour gold with brown shadows along the lower edges and detail lines.
- First highlight: Retributor Armour mixed with Liberator Gold (brighter metallic). Applied to the top edge of each gold section.
- Second highlight: Liberator Gold pure, applied to the sharpest corners of the V-piece.
RESULT: The gold reads as deliberately metallic with sharp catchlights. The cel-shading gives it depth, and the edge highlighting gives it the metallic punch that makes gold feel like gold.
👉 Learn to Repaint: Figure Painting Course
Common Mistakes to Avoid
❌ Highlighting every raised surface equally
- Edge highlighting is a technique of restraint
- Highlighting every edge dilutes the effect
- Pick the sharpest, most important edges and give them clean definition. Leave secondary edges unhighlighted
❌ Using paint that is too thick
- Thick highlight paint creates fuzzy, blurred lines that ruin the technique
- Thin highlight paint should be slightly thinner than base coat paint and applied with a very lightly loaded brush
❌ Jumping straight to pure white
- Pure white as a first highlight on most colours looks stark and disconnected
- Build toward white through intermediate lighter tones
- Two or three highlight steps produce significantly better results than one extreme jump
❌ Highlighting in the wrong direction
- Each highlight stroke should follow the direction of the surface form
- Cross-grain highlights look unnatural and break the illusion of a sculpted, lit object
❌ Skipping the cel-shading stage
- Edge highlighting on a figure without cel-shading produces a flat, disconnected effect
- The technique needs the shadow structure to push against
- Without shadows, the highlights have nowhere to land
❌ Working in poor lighting
- Edge highlighting precision depends entirely on seeing the figure's structure clearly
- Strong, neutral lighting is non-negotiable for this stage
❌ Using a worn brush
- A brush with a damaged tip cannot place a clean line
- Edge highlighting is the one stage where brush quality genuinely matters
- Replace brushes the moment they lose their tip
Edge Highlighting Different Surface Types
Different surfaces respond to edge highlighting differently, and adjusting the approach for each delivers noticeably better results.
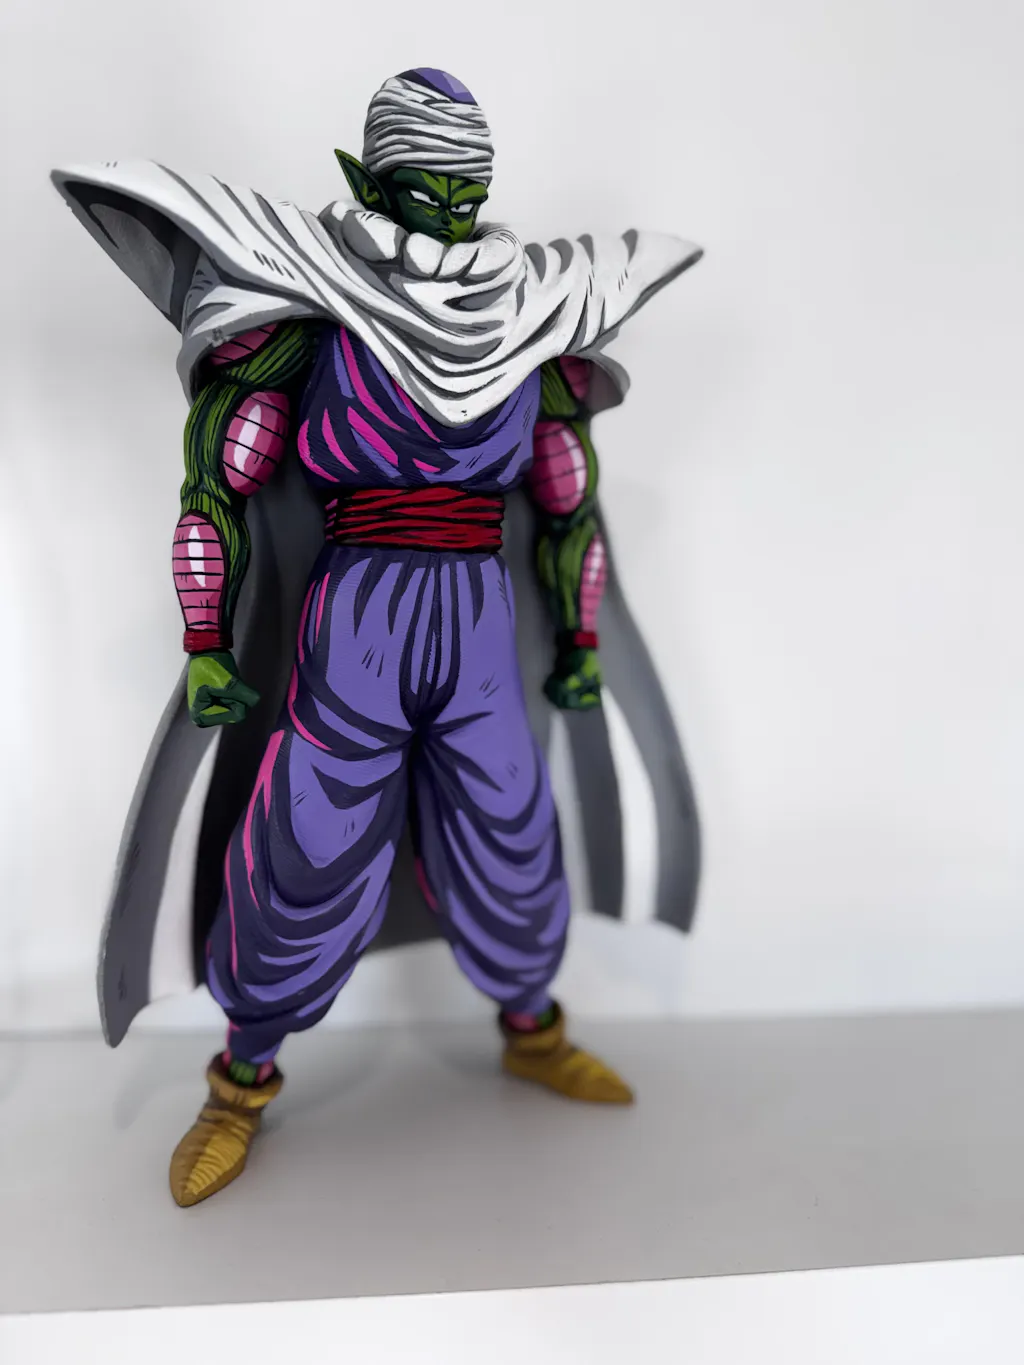
1. Smooth flat surfaces (armour panels, capes, large flat costume areas):
Flat surfaces show every edge highlighting inconsistency. Use very thinned highlight paint and place the highlight along the chosen edge with a single confident stroke. A second pass with a slightly brighter mix sharpens the highlight further.
2. Muscular surfaces (chest, biceps, thighs):
Muscle edge highlights run along the top ridge of each muscle group, following the muscle direction. The sharpness of a muscle edge highlight depends on the sculpt — defined sculpts take sharp highlights, softer sculpts take more gradient-style highlighting.
3. Hair sections:
Hair benefits from edge highlights running along the top edge of each spike or segment, in the direction of the hair growth. A second highlight at the very tip of each spike creates the sharp anime hair quality.
4. Faces and skin:
Face edge highlighting is the most subtle and demanding work in this stage. Use a size 00 brush and apply tiny, controlled highlights to the bridge of the nose, the tops of the cheekbones, the chin, and the forehead on your model. Less is more — face highlighting errors are highly visible.
5. Armour and metallic surfaces:
Armour edge highlights target the top and outer edges of each panel specifically. For metallic surfaces, the highlight gradient typically goes from base metallic to brighter metallic to a final pure-metallic spot, rather than mixing in white.
Frequently Asked Questions
What is the difference between edge highlighting and layered highlighting?
Edge highlighting applies a lighter colour to the sharpest edges and corners only. Layered highlighting applies a lighter colour to broader raised surfaces.
Both are useful, and most strong repaints use a combination — layered highlighting on smoother surfaces like skin, edge highlighting on sharper surfaces like armour and hair.
How many highlight steps should I apply?
Two highlight steps is the practical minimum: a first lighter highlight along the chosen edge, and a second brighter highlight on the sharpest points within it.
Three steps — first highlight, second highlight, and a final spot highlight on key corners — produces noticeably better results for figures intended for display or photography.
Should I edge highlight every figure?
Almost yes. Edge highlighting transforms the visual quality of nearly any figure regardless of style. The only common exception is figures specifically painted in extreme realistic styles, where soft layered highlighting suits the look better than sharp edge highlights.
How long does edge highlighting take for a full figure?
For a mid-size Dragon Ball figure, full edge highlighting typically takes between three and six hours across multiple sessions. The technique demands precision and patience. Rushing it produces visibly inferior results.
Can edge highlighting fix a weak repaint?
Partially. Edge highlighting cannot fix poor base coats or messy washes, but it can dramatically improve a figure that has solid foundations and just needs the final visual punch.
What if my edge highlights look too bold?
Edge highlights almost always look stronger close up than they do at display distance. Before deciding a highlight is too bold, view the figure from arm's length and from across the room. Most "too bold" highlights look exactly right at normal viewing distance.
Do I need expensive brushes for edge highlighting?
Brush quality genuinely matters more for this technique than for any other stage. A high-quality size 0 sable or sable-blend brush makes a noticeable difference compared to a budget brush. You do not need the most expensive brushes available, but the cheapest detail brushes will limit the precision you can achieve.
Can I use an airbrush for edge highlighting?
No. Airbrush highlights are soft and gradient-based — the opposite of what edge highlighting is designed to produce. Edge highlighting is fundamentally a brush technique that depends on physical control and sharp deposition.
Conclusion: Figure Edge Highlighting
Figure edge highlighting is the technique that finishes a repaint properly. It is the stage where everything you have done so far — priming, base coating, washing, layering, cel-shading — gets the final element it needs to read as a fully lit, three-dimensional figure. Without it, the work feels incomplete.
With it, the figure achieves the visual punch that makes collectors stop and look twice. The technique is not difficult. It rewards precision, restraint, sharp brush work, and the discipline to highlight only the most important edges rather than everything.
Two or three controlled highlight steps, applied with confident single strokes along the figure's sharpest edges, produce the kind of result that genuinely separates collector-level work from amateur attempts to painting miniatures..

Share:
Step-by-Step Figure Cel Shading Guide for Beginner Artists
Step by Step Figure Eye and Face Detailing Guide