This 90-day plan covers choosing a niche, setting up Instagram and one marketplace, photographing your work properly, pricing with confidence, and opening limited commissions only when your work is genuinely ready to represent your name publicly.
If you have already painted a few action figures, you are not a beginner. You have already felt the frustration of a face that looked right under the desk lamp and fell apart in a photo. This plan assumes you have some repaints behind you. Not hundreds. Not a full portfolio.
Table of contents:
- Weeks 1–2: Build the foundation
- Weeks 3–4: Create portfolio
- Weeks 5–6: Photography
- Weeks 7–8: Create first listings
- Weeks 9–10: Open commission slots
- Weeks 11–12: Refine your process
- Frequently Asked Questions
What the First 90 Days Should Actually Achieve?
Most 90-day plans set the wrong goals. They talk about follower counts, revenue targets, and brand identity as if those things come first. They do not.
The right goals for your first 90 days are:
- A clear niche that shapes every decision you make
- A small portfolio of repaints that hold up in photographs
- One main social platform set up with intention
- One marketplace or sales channel ready to use
- A pricing structure you can explain and defend
- A photography setup that actually sells your hand-painted work
- Enough trust signals that a first buyer does not feel like they are taking a risk
The first 90 days are not about pretending to be established. They are about building credibility quietly and consistently. If your work is improving, your hand-painted figurines look clean, and the right people are starting to notice your service, that is real progress.
📅 Weeks 1–2: Build the Right Foundation

Step 1: Choose Your Niche
Do not try to sell everything at once or international. That is one of the fastest ways to look scattered and forgettable, and it makes every other decision harder: what to post, who to talk to, which communities to join, which keywords to use.
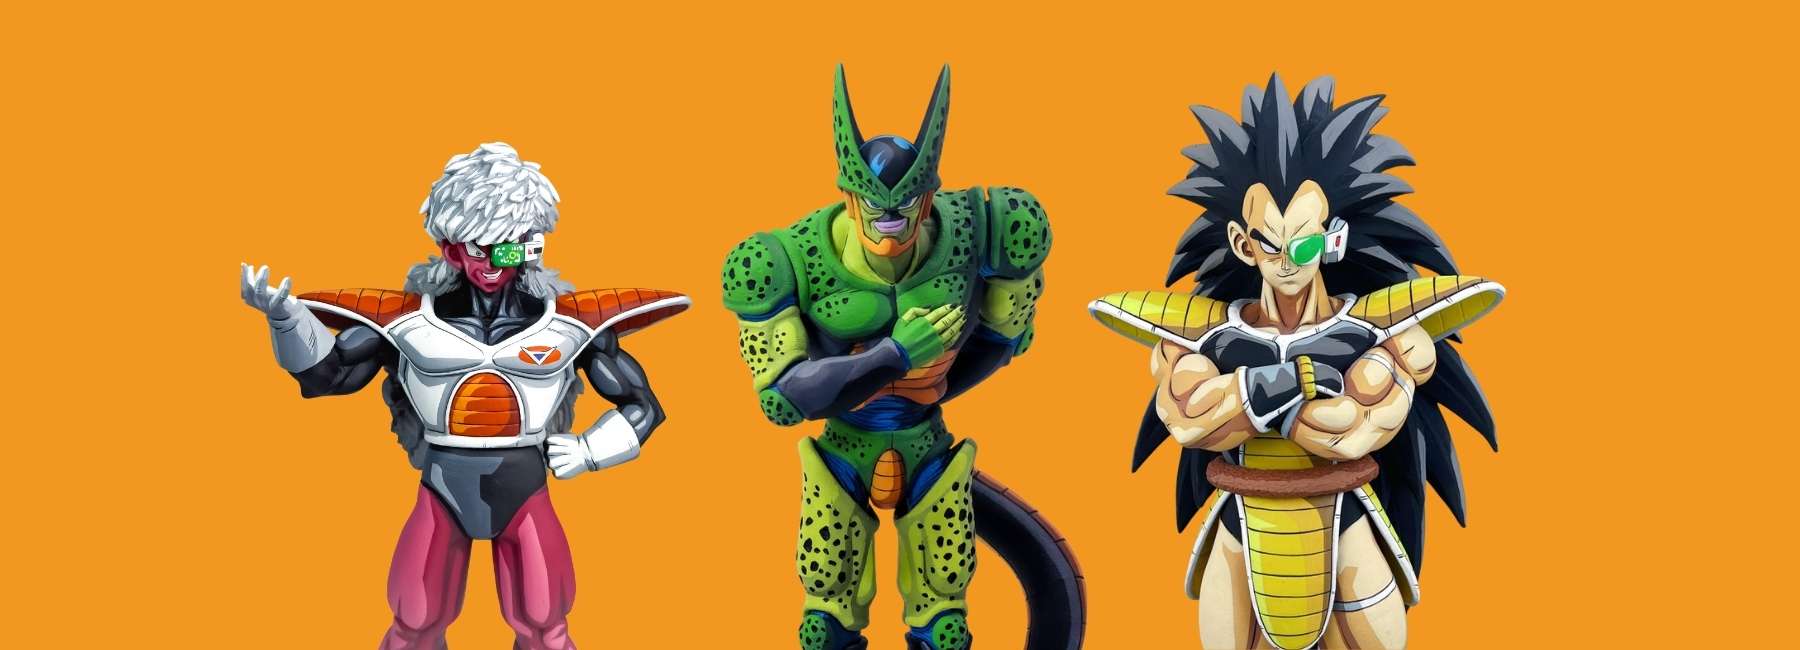
Pick one lane for the first 90 days. That might be Dragon Ball Z, Marvel Legends, horror characters, JRPG figures, mecha kits, or something else entirely. The niche itself matters less than your commitment to it. A page that goes deep on one thing always builds an audience faster than a page that tries to cover everything.
How to choose:
- Look back at your repaints so far
- Which figures felt strongest?
- Which ones got the most interest when you showed someone?
- Which characters do you genuinely enjoy painting, because that will show in the work?
Choose the style and character category you can repeat consistently, not just the one that sounds most exciting right now.
What to avoid:
- Mixing anime repaints, superhero customs, horror pieces, and random kits on one fresh page unless they share a genuinely consistent standard and finish
- Calling yourself a custom figure artist for everything when your strongest work clearly lives in one category
- Chasing trends rather than building on what you already do well
Step 2: Choose a Brand Name
Your name does not need to be clever. It needs to be clear, consistent, and easy to find. If you can work a relevant keyword into it naturally, that helps with search visibility on Google, Etsy, and elsewhere — but do not force it at the expense of something memorable.
A good brand name is:
- Easy to spell and remember
- Not too long
- Relevant to what you actually do
- Available on Instagram and your chosen marketplace
Examples across different niches:
- Tom Figure Painting — clean, personal, direct
- HeroShading Artist — broader, works for Marvel or DC
- SaiyanBrush — niche-specific, memorable
- HorrorFigureArt — descriptive, keyword-friendly
- IronCoat Painter — works for mecha or armoured characters
Check Instagram and your chosen marketplace before settling on a name. Consistency across platforms matters more than perfection.
What to avoid:
- Random numbers at the end of a name
- Hard-to-spell words or symbols
- Something so broad it could apply to any creative business
Step 3: Set Up Instagram Properly
Instagram is the right place to start because it doubles as both a portfolio and a contact channel. Collectors browsing for custom work will look at your grid, decide within seconds whether the work looks serious, and either DM you or leave.
Your setup checklist:
- Clear username that matches your brand name
- A simple profile image or logo — not a random selfie if the rest of the page is brand-led
- A bio that says exactly what you do, who you make it for, and how to reach you
- Switch to a creator or business account
- Create three Story Highlights: Process, Portfolio, Commissions
Bio example: Custom figure repaints | [Your niche] focus | Before & afters, process, limited commission slots | DM for enquiries
Keep the bio practical. Say what you do, not what you aspire to be.
What to avoid:
- Leaving the bio blank or vague
- Writing like a large studio when you are still building
- Mixing personal content into a brand-led account
- Posting before the page looks intentional
Step 4: Choose One Sales Channel
You do not need to be everywhere, especially when focusing on international sales. You need to be somewhere that works.
| Platform | Best For | Buyer Type | Drawbacks |
|---|---|---|---|
| Etsy | Custom/handmade focus | Buyers who expect one-of-a-kind pricing | Listing fees, slower initial visibility |
| eBay | Faster testing | Broader, more price-sensitive audience | More commoditised feel, harder to stand out |
| Local sales | Local buyers, shipping-averse | Limited reach, less buyer trust for premium items |
- Etsy suits a handmade or custom feel, attracts buyers who understand one-of-a-kind pricing, and gives you built-in search traffic from people already looking for custom figures
- eBay offers a broader buyer base and faster testing, but the audience is more price-sensitive
- Facebook Marketplace can work for local sales with less shipping complexity early on
Instagram plus one marketplace is more than enough to start. Do not launch Etsy, eBay, Facebook Marketplace, and TikTok Shop simultaneously. Spreading thin means none of them gets the attention they need to perform.
Your setup checklist:
- Create the account and complete the profile fully
- Write a short, specific shop description
- Set your shipping region and research packaging costs before you list anything
- Create a draft listing template you can reuse
👉 Learn to repaint DBZ figures => Figure Painting Course
Step 5: Source Practice and Portfolio Figures
Purchase three to five figures you can work on without fear. These are not necessarily your final products — they are your learning and portfolio materials.
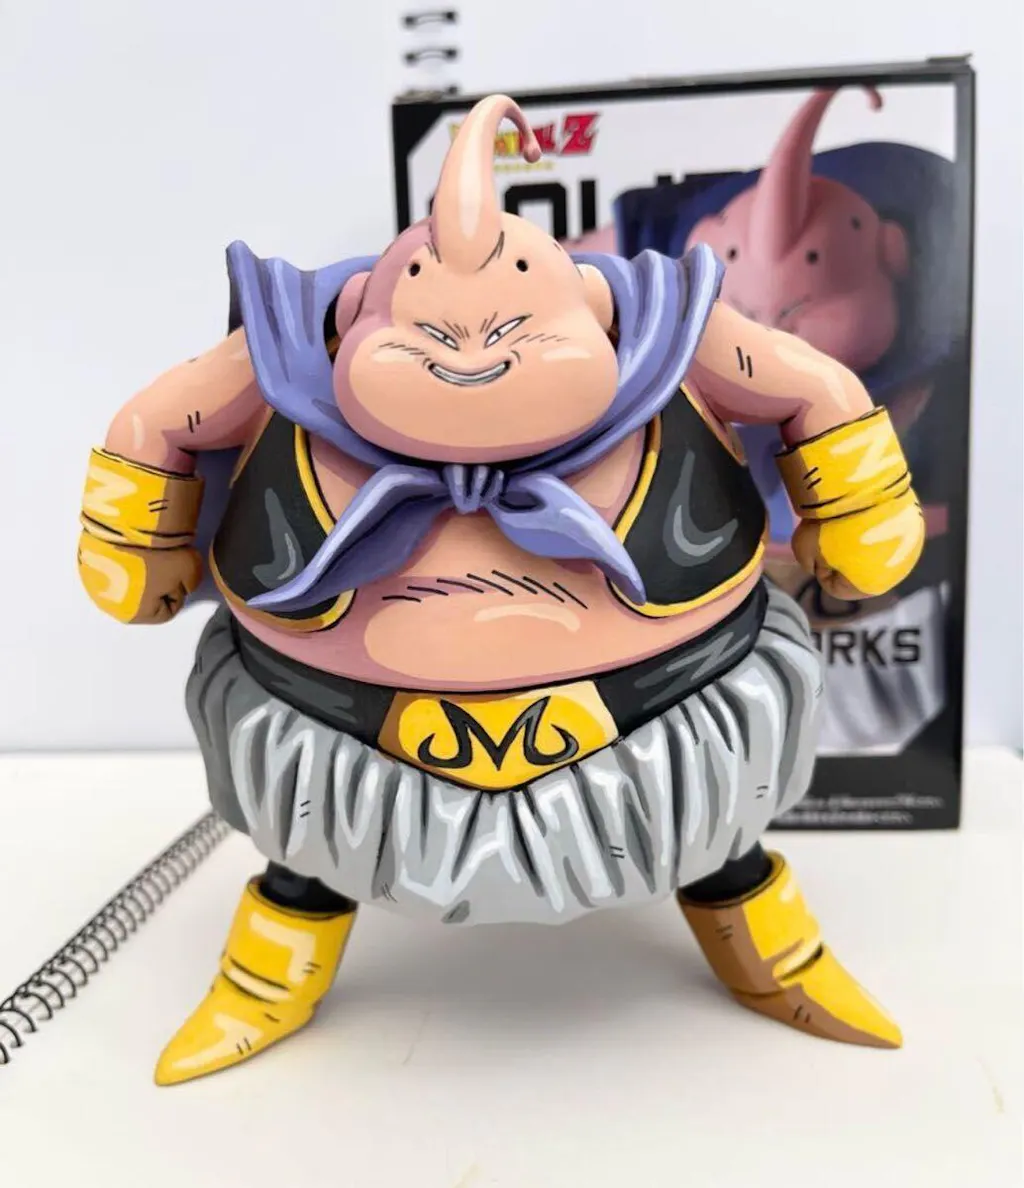
Choose characters with strong recognition and clear detail: faces with defined features, armour with visible panels, clothing with real folds. Mid-size figures of 25cm and above are significantly easier to photograph well.
Recognisable characters from whatever unique niche you have chosen will serve you better early on. People already search for action figures, already have emotional investment in them, and can immediately judge whether your version improves on the original.
What to avoid:
- Starting with a rare or expensive collection before your process is consistent
- Buying very small hand-painted figurines that are difficult to paint cleanly
- Stockpiling random toys just because they were cheap
Step 6: Build a Simple Workspace
A well-organised workspace is not a luxury. It directly affects your consistency, your painting quality, and the content you produce. A chaotic desk leads to chaotic results.
What you need:
- A surface with enough room for the figure, paints, water, and brushes at the same time
- Strong, neutral lighting — ideally two sources to eliminate shadows that hide paint mistakes
- A painting mat that protects the surface
- A ventilated area or outdoor space for priming and sealing
- A clean, neutral photo background — white, grey, or black
- A phone stand or tripod for consistent photography
Painting supplies:
- Acrylic paints (Vallejo Model Color is a reliable starting point)
- A brush set covering base coats, medium detail, and fine liner work
- A wet palette
- Water pots
- Paper towels
- Cotton buds
- Isopropyl alcohol
- Primer
- Matte varnish
Build the workspace so the process has a clear flow: prep, prime, paint, dry, photograph, pack. The easier it feels, the more consistently you will do it.
Step 7: Tighten Your Process Before You Sell Anything
You already know the stages. Clean the figure, prep the surface, prime, build base coats, add shading, layer up, add highlights, paint the face, and seal. The question now is whether you can do all of those stages consistently and whether each new figure is visibly better than the last.
Do not try to learn advanced effects before the core stages look clean. Techniques like zenithal priming, cel-shading, and edge highlighting are all useful skills — but not if your base coats are patchy or your face work is still unreliable.
What to avoid:
- Posting weak practice pieces publicly just because they are finished
- Judging your work only from a distance — always zoom in the way a buyer will
- Confusing effort with quality. The collector sees the result, not the hours
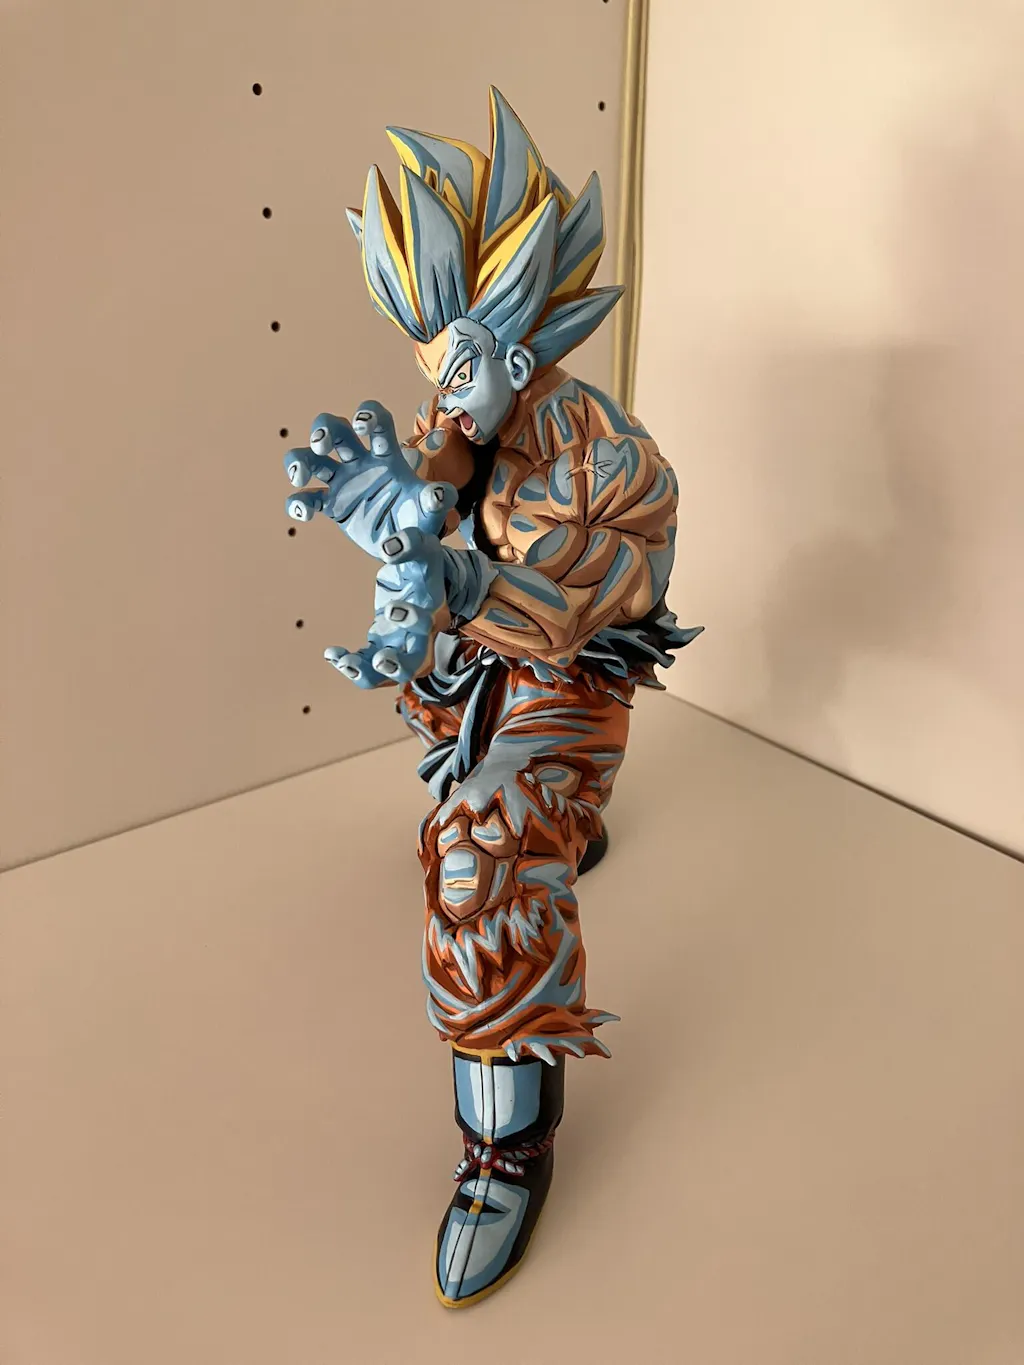
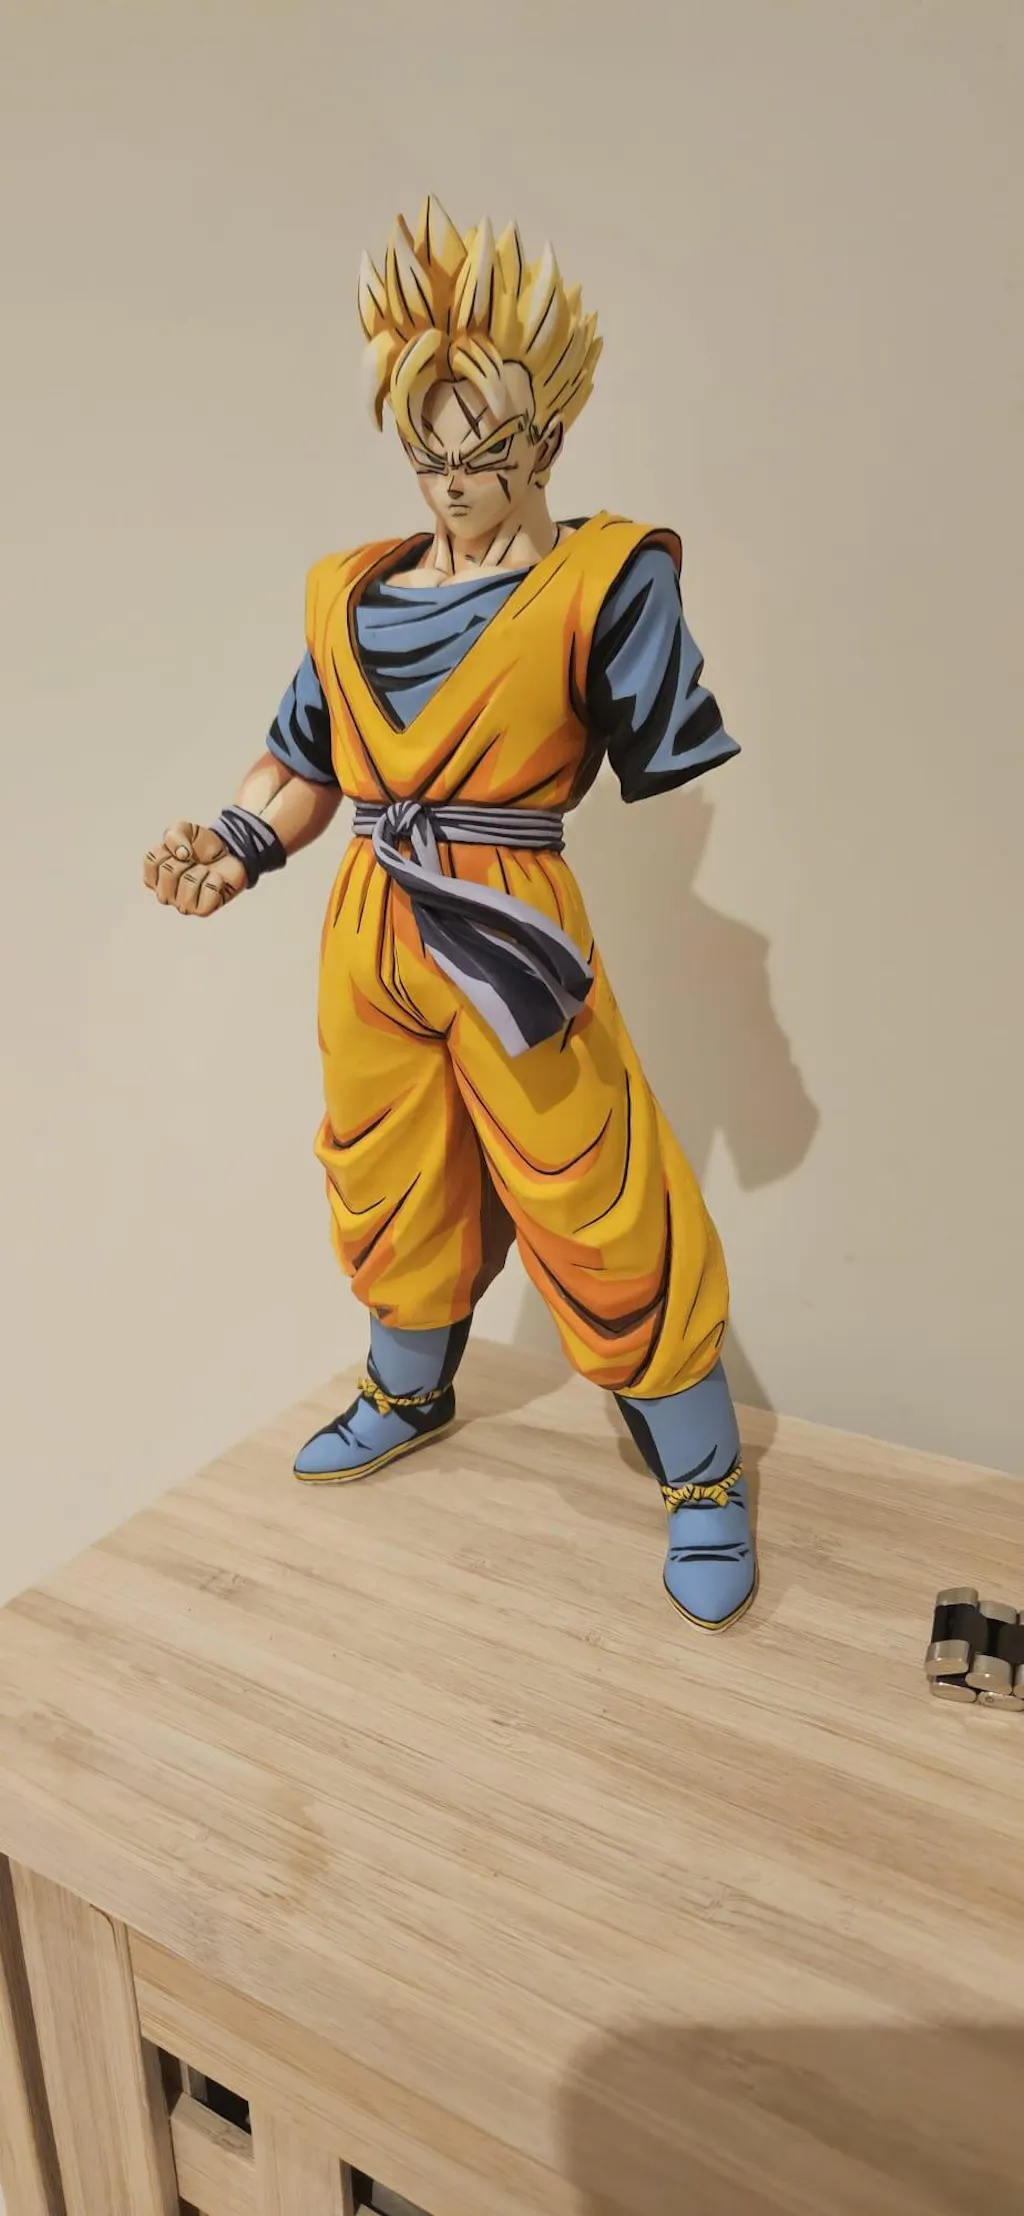
📅 Weeks 3–4: Create Portfolio-Worthy Work

The goal here is not volume. It is finishing a small number of pieces that genuinely represent your current best. Two or three strong repaints will serve you better than ten average ones.
Each figure should generate multiple assets:
- An original figure photo
- A prep or priming image
- A work-in-progress shot
- A close-up of the face
- A full-body finished shot
- An angled shot
- A before-and-after comparison
What to avoid:
- Posting every repaint regardless of quality
- Convincing yourself that "custom" automatically means sellable
- Using bad lighting to hide mistakes — it never fully works and it trains buyers to distrust your photos
📅 Weeks 5–6: Photography That Sells Your Work
Photography is not a nice-to-have. It is arguably the single biggest factor in whether a listing converts.
A technically average repaint with excellent photography will outsell a superior repaint with flat, badly lit photos almost every time in this market. Collectors browse on small screens and make fast decisions. Your photo has to stop them.
What good figure photography requires:
- Lighting: Two light sources at slight angles eliminate the flat, washed-out look of single direct light. Natural daylight near a window works well. Avoid harsh overhead lighting — it kills surface detail and makes paint transitions look rougher than they are.
- Background: Keep it neutral and consistent. White, light grey, or matte black all work. A consistent background makes your page look professional and puts full attention on the figure.
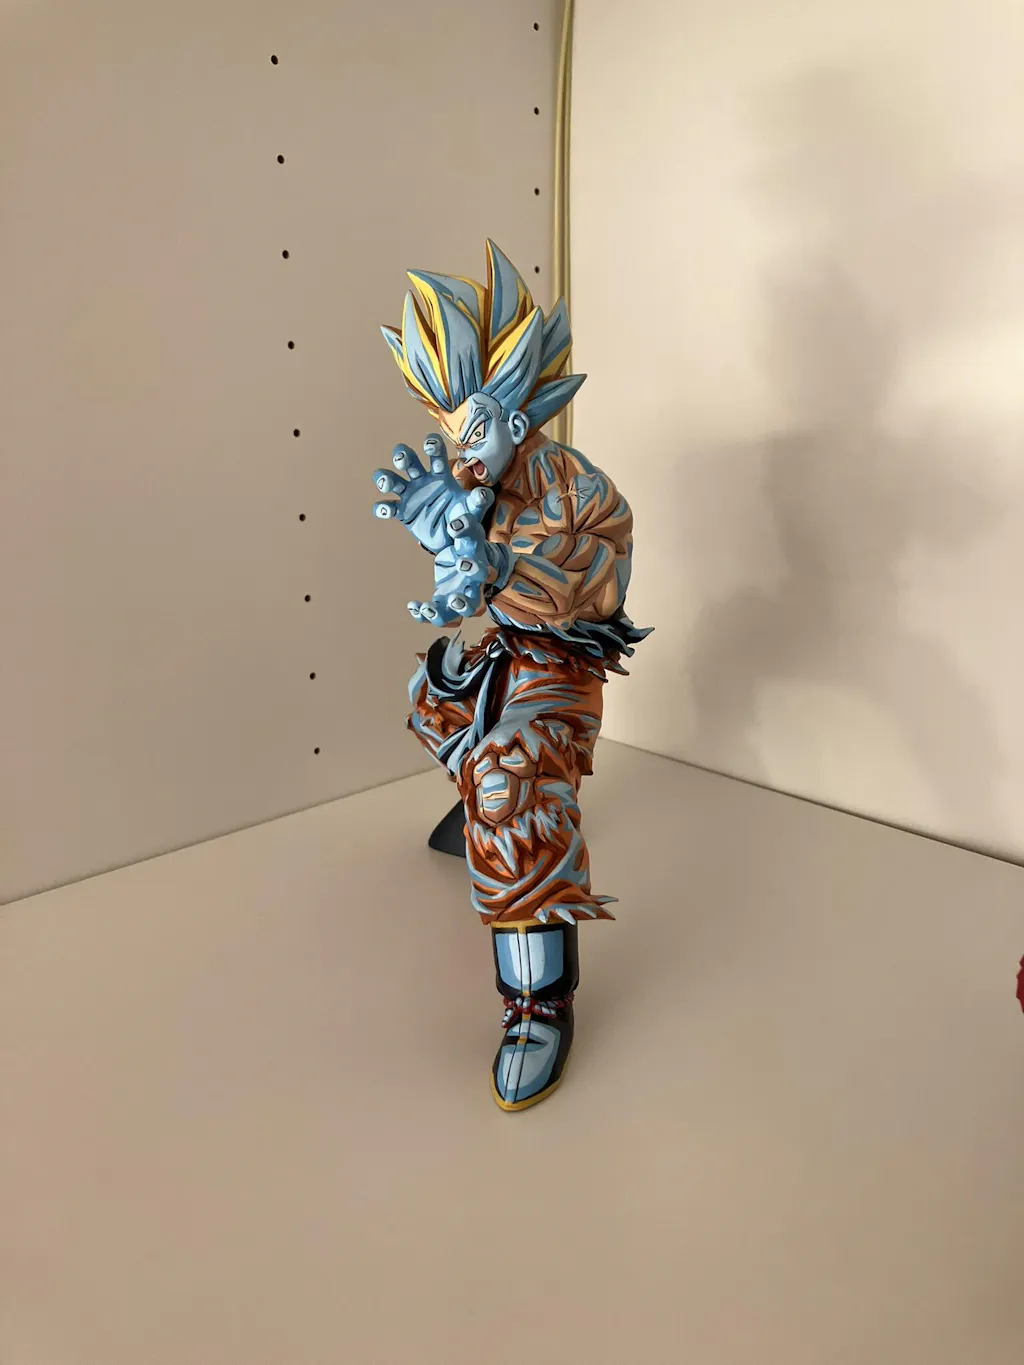
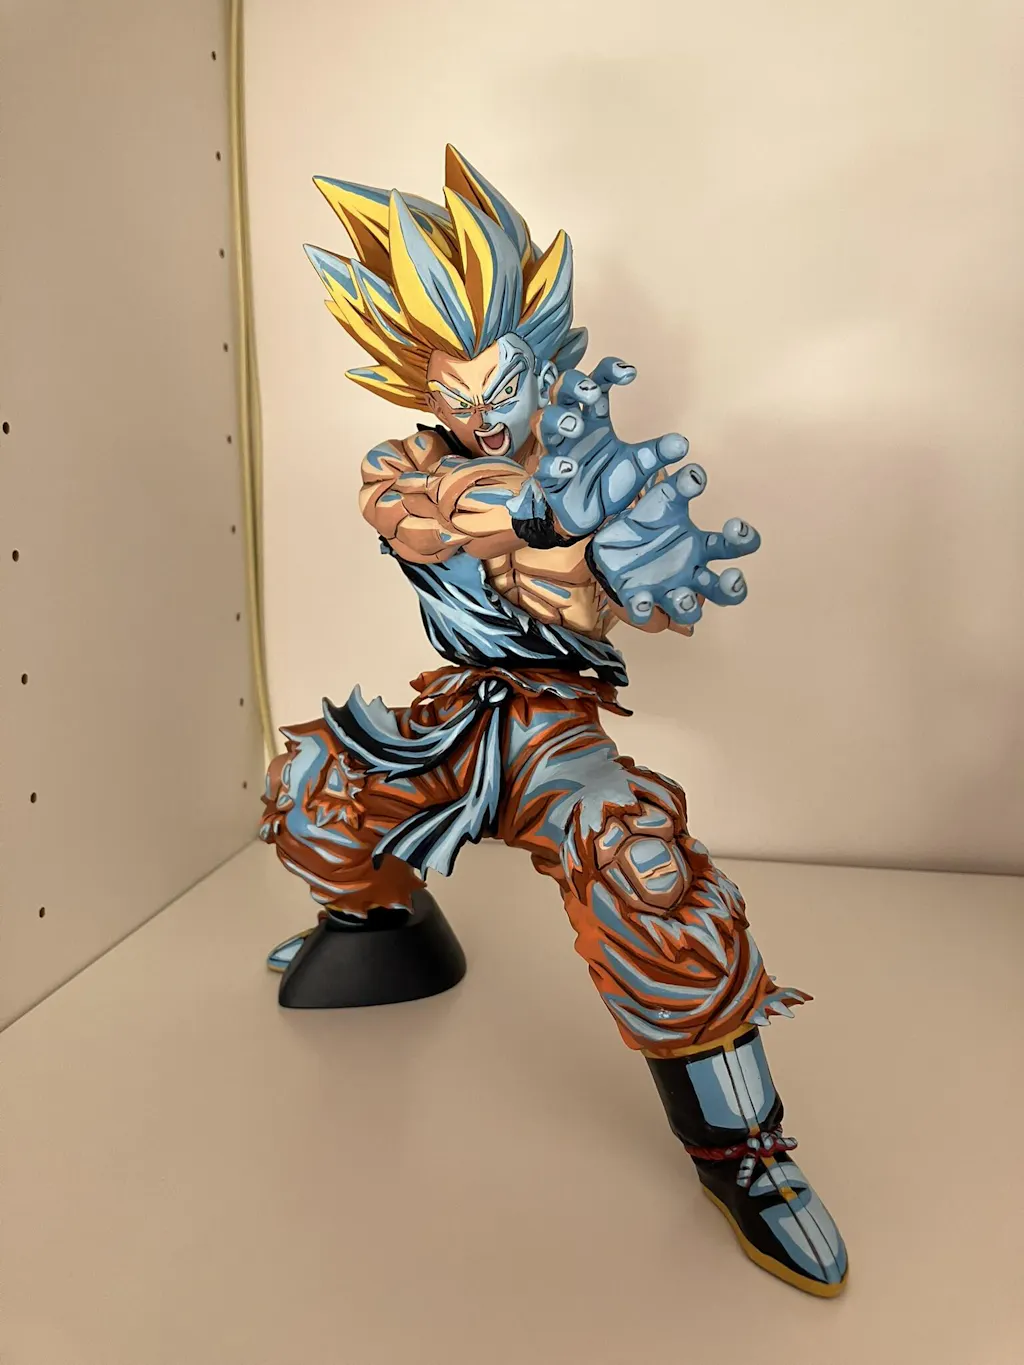
- Angles: Always shoot a full-body front shot, a three-quarter angle, a direct face close-up, and at least one detail shot — armour, weapon, clothing fold, or hair. Buyers want to see exactly what they are paying for. More good angles reduce hesitation.
- Before-and-after: This is your single most powerful content format. It demonstrates skill in a way a finished shot alone never can. Make it a consistent part of how you document every piece.
- Phone settings: Shoot in portrait mode for close-ups. Clean the lens. Use manual focus where possible to control exactly what is in focus. Never use the zoom — move physically closer instead.
- Orientation: Shoot vertical for Instagram, but include some horizontal shots for marketplace listings, where wider product images often display better.
Publishing Your First Serious Posts
Your first three posts should consist of the following:
- A before-and-after carousel with a caption that explains what changed and why
- A close-up detail post focused on a specific area of strong work — face, armour, or hair
- A short process Reel showing key stages with a simple voiceover or text overlay
After that, aim for two feed posts and one Reel per week. Stories work well for smaller updates, polls, and progress shots that do not need to be permanent.
Building Genuine Community:
Rather than chasing followers through artificial tactics, invest that time in real engagement.
Practical recommendation:
- Comment meaningfully on collector pages, not just emojis
- Engage in niche subreddits and Facebook groups
- Post process questions and invite conversation
- Collaborate with other figure artists — share their work if you genuinely rate it
Community-driven growth is slower but it brings actual buyers, not ghost accounts.
What to avoid:
- Filling the page with weak content to appear active
- Posting in a burst and then disappearing for two weeks
- Leaving comments that add nothing — generic praise signals an account that is just fishing for follows
📅 Weeks 7–8: Create Your First Listings

Choose only your best one or two pieces. Your first listings are trust signals as much as they are sales attempts. A poor listing reflects on all future work even after it sells.
Each listing needs:
- A clear title that includes the character name, repaint style, and finish type
- Six to ten strong photos including full body, face close-up, angled shot, and before-and-after
- A description that explains what was repainted, what techniques were used, how it was sealed, and what condition it is in
- Clear information on packaging, shipping, and handling time
Sample listing title structure:
- Custom Vegeta Figure Repaint | Cel-Shaded Anime Style | Sealed Display Piece
- Hand-Painted Goku Figure | Super Saiyan Custom Repaint | Matte Sealed
- Marvel Legends Iron Man Repaint | Battle-Damaged Custom Finish | Ready to Ship
What to avoid:
- Listing weak pieces because you want something in the shop
- Using vague titles like "Custom Figure" with no character name
- Leaving out details that buyers will ask about anyway — it creates unnecessary back-and-forth and signals an unprepared seller
📅 Weeks 9–10: Open Limited Commission Slots
If your work is now consistent enough — meaning the face quality holds up in close-ups, the finish is clean, and you have documented the full process at least twice — you can test limited commissions.
Create one commission announcement post using your three strongest pieces.
Sample commission announcement structure:
🎨 COMMISSION SLOTS OPEN — 2 spots available
- Specialising in: [Your niche, e.g., Dragon Ball Z anime-style repaints]
- Starting price: £[X]
- Turnaround: [X] weeks
- Buyer provides figure / I source it: [Specify which]
- DM for enquiries — saved questionnaire makes the process simple
Open one or two slots only. The goal is to test the process end-to-end, not to fill a calendar. Use a saved reply template for enquiries so your communication feels professional from the first message.
What to avoid:
- Opening full commissions before your face work is consistently clean
- Agreeing to requests outside your niche just because someone asked
- Undercharging because you are nervous — it sets a floor that is hard to raise later
| 👉 Figure Painting Course: How to Repaint Vegeta from Scratch 🎨 |
How to Price Repainted Figures: A Real Worked Example
The standard advice — add your costs, calculate your hours, apply a markup — does not work here. If a single repaint takes forty hours across a week, a true hourly rate produces a price no beginner seller will ever shift.
The hourly model either prices you out of the market or forces you to lie to yourself about what your time is worth.
Know Your Hard Floor
This is the minimum at which you are losing money, regardless of anything else.
- Base figure - £15
- Packaging - £5
- Platform fees - from 10%
Research What the Market Actually Pays
Spend an hour on Etsy and eBay searching completed listings — not active ones. Completed listings show what people actually paid. Custom figure repaints from beginner-to-mid sellers typically land between £50 and £150, depending on character, size, and finish quality. That is your working range.
Price Level by Reputation Level
A seller with forty+ reviews can charge £300. A seller in month two with five posts cannot — not because the work is worse, but because the buyer is taking a leap of faith.
Price accordingly:
- Starting out: £60 - £120 for a strong mid-size repaint
- After ten positive transactions: £100 – £150 for the same work
- Established reputation: £150 and above
The Honest Truth About Time
A figure that takes a full week will not pay minimum wage at £100. Not yet. That time is building your skill, your portfolio, and the reputation that lets prices rise later.
Every artist now selling at £200+ started with pieces that did not pay them properly. The return is deferred — it comes through faster painting, better work, and a review history that justifies the premium.
📅 Weeks 11–12: Refine the System Using Real Data
This is not the phase to keep guessing. Stop and look at what actually happened over the previous ten weeks. The goal is to build a simple weekly rhythm based on what is working, not what you assumed would work with your 3D print items.
Metrics to review specifically:
- Which posts got the most saves (saves signal genuine interest more than likes)
- Which listing got the most clicks and which one converted
- Which figure generated the most DMs
- What was your average response time, and whether it affected trust
- Which stage of your process still slows you down or drops quality
- Whether your photography improved and whether that correlates with engagement
Build a simple repeatable weekly system:
- One finished figure post with full caption
- One close-up or detail post
- One before-and-after Story or feed post
- One engagement session in relevant communities
- One listing refresh or price review
What to avoid:
- Changing your brand direction every time a post underperforms
- Leaving old, weaker work front and centre as your standard improves — archive it or push it down
- Tracking vanity metrics like total followers over meaningful ones like saves, DMs, and click-through rates
Frequently Asked Questions
Do I need to be an established artist before I can sell?
No, but you need enough consistency that the work looks intentional and clean. If your last three repaints are visibly improving and you can attach your name to them without embarrassment, you are ready to start building. The bar is not perfection — it is credibility.
How many repaints should I have before selling?
There is no magic number, but fewer than five completed pieces makes it very hard to demonstrate a consistent standard. If you have roughly eight to ten repaints done and can already see clear improvement across them, you are in the right zone to start building a public presence.
Do I need a website in the first 90 days?
Not immediately. Instagram and one marketplace are enough to start building trust and making sales. That said, as your commission volume grows and you want more control over your brand, presentation, and pricing, a dedicated website or store becomes a strong next step — one that can also work harder for you through SEO and direct enquiries.
Can I grow without spending money on ads?
Yes, but only if the work is strong and you are genuinely consistent. Organic growth in this niche comes from compelling visuals, honest process content, client trust, and repeated visibility in the right communities. Paid ads can accelerate reach, but they cannot fix weak work or an underdeveloped page.
What platform should I focus on first?
Instagram is the best starting base because it functions as both a portfolio and a direct contact channel. After that, Facebook, TikTok and Pinterest can extend your organic reach significantly, especially if your process content is strong. Pinterest in particular is underused in this niche and has long-tail search value that compounds over time.
What do I do when someone haggles on price?
Have a prepared response and stick to it. "My prices reflect the materials, time, and skill involved — I'm not able to go lower, but happy to answer any questions about the process." Discounting on request early in your career sets a precedent you will struggle to undo.
Conclusion: Selling Repainted Figures Online
After a few repaints you will hit a moment where a figure finally looks right in photos — the eyes, the shading, the overall feel — and you will know it could be wanted by someone.
Doubt is normal at that stage. The cure is to show the work honestly, with one clear public presence that lets the pieces speak for themselves.
The 90-day plan here helps you avoid the early mistakes that derail most beginner sellers: listing too soon, under-pricing, opening commissions before your process is steady, or trying to be everywhere at once.
If your work keeps improving, your photography is sharp, and the right people start to find you, the system is working. Build credibility first, and the sales follow.

Share:
How to Repaint Action Figures: Collectors' Guide
Top 8 Figure Painting Techniques for Dragon Ball Artists