Cel-shading is the technique that pushes a figure away from soft, realistic painting and toward the bold, animated quality that makes anime characters feel alive on screen. It is what gives Vegeta's bodysuit that crisp, illustrated look. It is what makes Goku's hair feel sharp and defined rather than soft and rounded.
It is what separates a competent repaint from one that genuinely captures the source material. The characters were designed in animation, drawn with bold lines and clear shadow shapes, and any repaint that ignores that visual language will always feel slightly off. Soft blending might work beautifully on a historical bust or a fantasy miniature — on a Dragon Ball Z figure, it kills the look entirely in a manga style.
Table of Contents:
- What is figure cel-shading?
- Why is cel-shading essential for anime-style repaints?
- Tools you need for figure cel-shading
- Understanding the cel-shading mindset
- Step-by-step cel-shading process
- How to apply cel-shading cleanly?
- Examples of cel-shading in practice
- Common mistakes to avoid
- Cel-shading different surface types
- Frequently asked questions
What is Figure Cel Shading?
ANSWER: Figure cel-shading is the technique of applying deliberate, hard-edged shadow shapes to a figure using a darker version of the base colour, creating the bold, graphic visual style associated with anime and 2D animation.
How cel-shading translates to figures:
- Translates 2D animation style into three dimensions
- Replaces soft, gradient shadows with sharp, painted shadow shapes
- Transitions between mid-tone and shadow stay clean and graphic, not blended
- The figure looks like it belongs in the anime rather than a realistic painting
What cel-shading delivers:
- Bold contrast that reads from across a room
- Clear silhouette definition that holds up at any display distance
- The animated quality that captures the source material
- Visual punch that separates anime repaints from generic painted figures
How cel-shading differs from washing:
- Washing creates soft shadow through gravity and capillary flow and produces natural-looking depth
- Cel-shading creates deliberate shadow shapes painted with a brush and produces graphic, illustrated depth
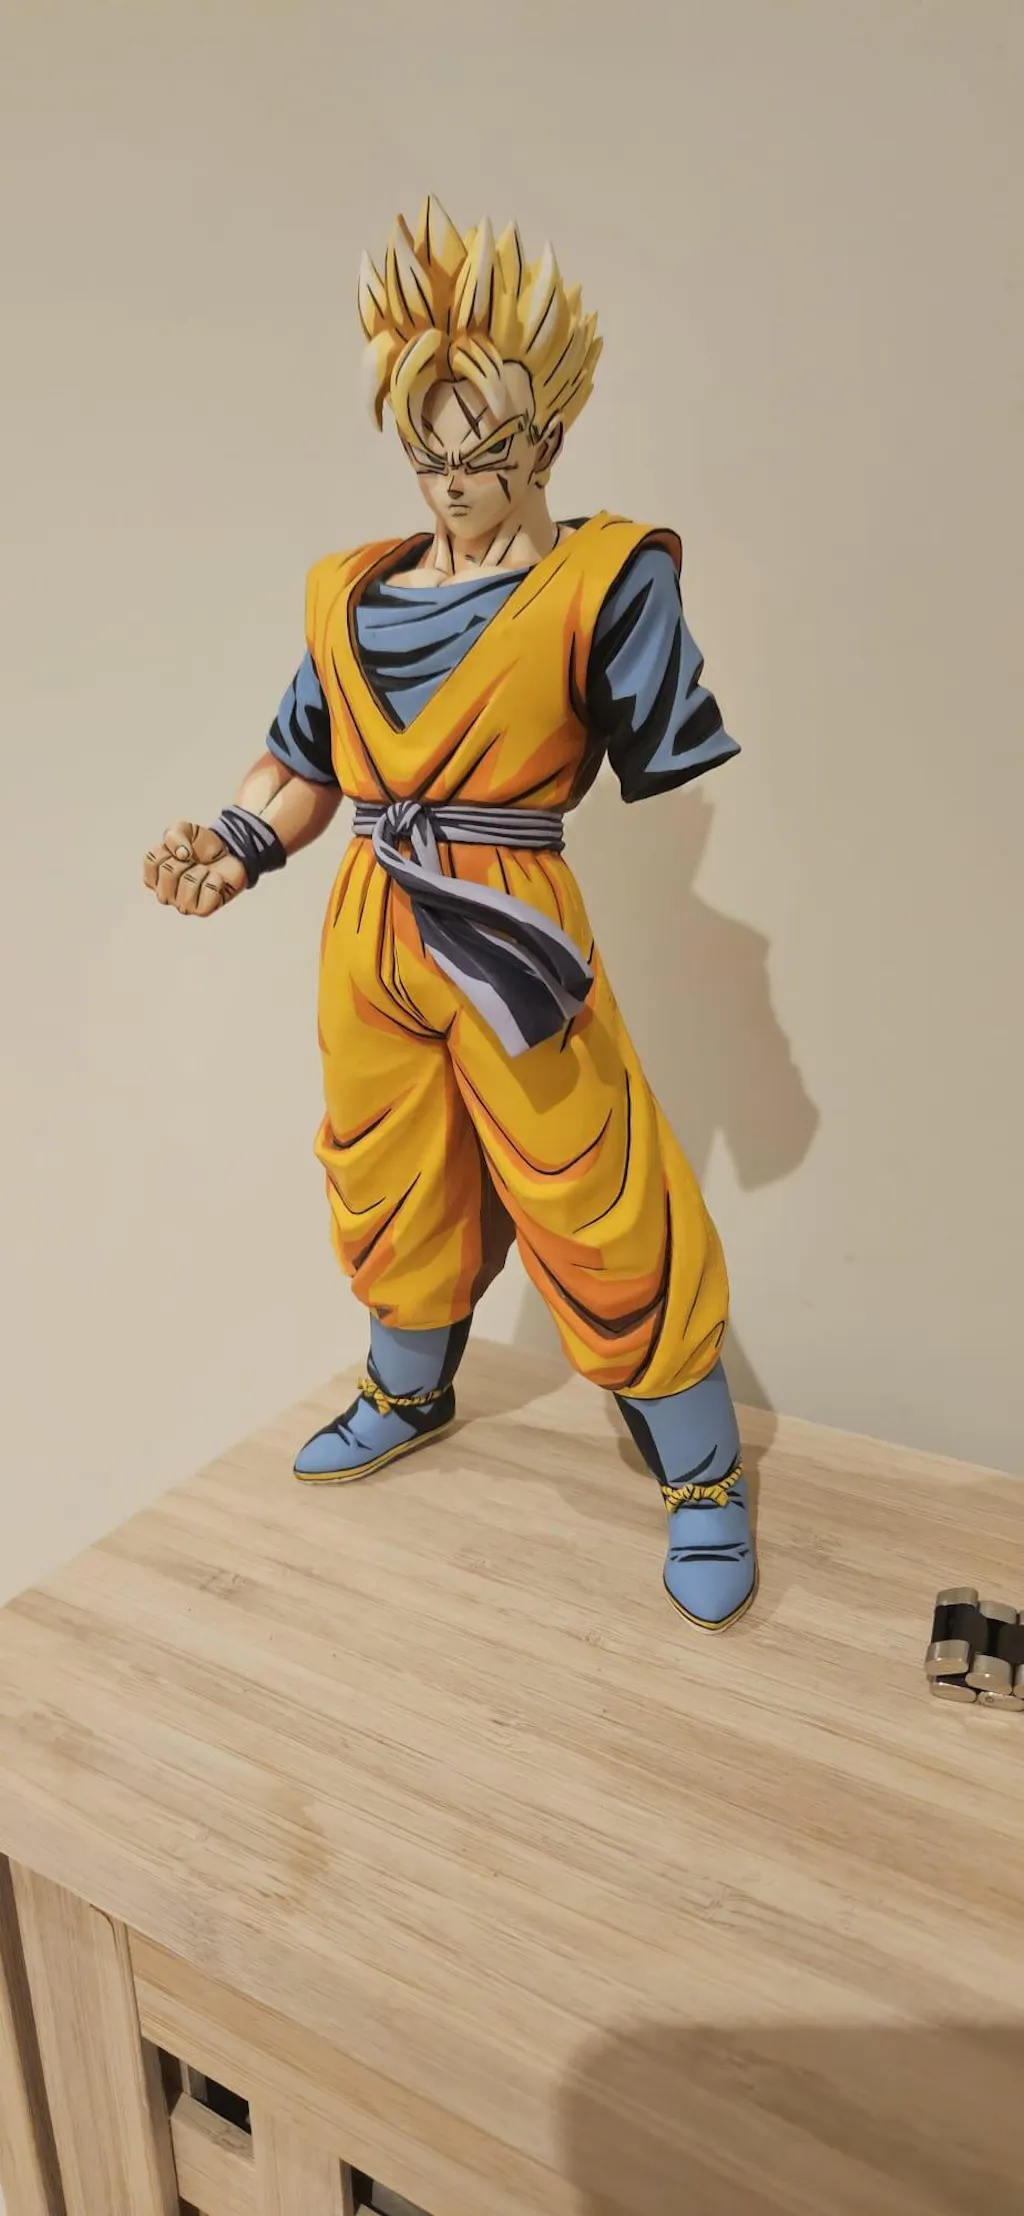
For figure painting, cel-shading is what gives the figure its final anime character. The shadows define the lower areas. The mid-tones fill the middle of the model. The cel-shaded shadow shapes give the whole piece its bold, illustrated personality.

Why Cel-Shading Is Essential for Anime-Style Repaints?
There are three reasons cel-shading matters more for anime figures than for any other type of repaint.
1. Anime characters are designed in 2D animation
Goku was never meant to look like a real person. His proportions, his colour palette, and the way light falls on him were all designed for animated drawings. When a repaint tries to apply realistic shading to an anime character, it fights the source material — and the source material always wins.
The figure ends up looking neither realistic nor animated, just slightly off. Cel-shading respects what the character was designed to look like. It pushes the visual language back toward animation, where it belongs.
2. Bold contrast is what makes a Dragon Ball figure pop
Most figures are viewed from a normal display distance — a few feet away, often under indirect lighting, often surrounded by other figures. Subtle shading disappears at that distance. Bold cel-shading does not.
A cel-shaded figure reads clearly from across a room. The forms hold up, the silhouette stays sharp, and the character remains recognisable in the comic style. That visual punch is exactly what makes a repaint feel premium.
3. It defines the figure's character
Vegeta's intensity, Goku's energy, Gohan's quiet determination — all of that lives in the boldness of how the character is drawn in the anime. Soft shading flattens that energy. Cel-shading preserves it.
For a beginner working through the eight core figure painting techniques, cel-shading is the technique that most clearly determines whether the finished figure feels like an anime character or just a generically painted toy.
Tools You Need for Figure Cel-Shading
Cel-shading uses a smaller, more precise toolkit than base coating or washing.
Essential tools:
- The same acrylic paints used for base coating — colour matching matters, because cel-shading uses darker variations of the existing base colours
- A darker shade for each base colour — either a darker pre-mixed paint or a small amount of black or a darker tone of the same colour family for mixing
- Detail brushes — size 0 for general cel-shading work, size 00 for tight precision around small details. Brush quality matters more here than at any earlier stage
- Wet palette — close to essential for cel-shading because consistent paint thinning over multiple sessions is critical
- Two water pots — clean and dirty
- Paper towel - for brush control
- Strong, neutral lighting — non-negotiable. Cel-shading precision depends entirely on being able to see the figure's structure clearly
Practical recommendations:
- Use a dedicated cel-shading brush kept separate from your base coating and washing brushes. Sharp tip retention matters significantly more here
- A wet palette dramatically improves cel-shading consistency. Mixed shadow colours stay workable across multiple sessions, which means consistent shadow tones across the whole figure
- Keep small mixing pots or palette wells for your shadow colours so you can return to the exact same mix later in the session
What to avoid:
- Cheap brushes that have lost their tip; cel-shading depends on placing a clean line of shadow exactly where intended
- Pre-mixed wash products as a substitute for cel-shading paint — they flow too freely and produce soft edges, which is the opposite of what cel-shading needs
- Mixing shadow colours fresh for each session without recording the ratios; the figure will end up with inconsistent shadow tones
Understanding the Cel-Shading Mindset
Cel-shading is as much a mental shift as a technical one. Most painting techniques aim for soft transitions, smooth blending, and natural-looking shadow. Cel-shading aims for the opposite.
1. Shadows are shapes, not gradients
In cel-shading, a shadow is a defined area with clear edges, like a shape painted onto the figure. It is not a soft transition that fades from dark to light. Once you start thinking about shadows as shapes rather than gradients, the technique becomes significantly easier to execute.
2. Sharp edges are the goal, not the problem
The instinct, especially for beginners, is to soften every edge to make it look "more natural." Resist that instinct. Sharp transitions are exactly what give cel-shaded figures their graphic, animated quality.
3. Boldness is rewarded
A cel-shaded shadow that feels too obvious during application almost always looks just right once the figure is at display distance. Timid cel-shading disappears. Bold cel-shading reads.
4. Reference matters more than guesswork
Anime artists have already worked out exactly where shadows should sit on each character. Looking at actual anime screenshots before painting tells you more than any amount of intuition.
Once these four points click, cel-shading goes from confusing to intuitive. The technique stops feeling like painting and starts feeling like translating the anime onto the figure.

Step-by-Step Figure Cel-Shading Process
This is the actual workflow from layered figure to fully cel-shaded figure in the studio.
✅ Step 1: Confirm the Layering Is Fully Dry
- Cel-shading goes on top of the layering stage and needs the layers fully dry before starting
- A layer that is still soft will lift when cel-shading is applied over it
- Wait at least 30 minutes after the final layering pass, longer if possible
✅ Step 2: Study Anime References for the Character
Before mixing paint, look at actual anime screenshots of the character you are painting. Pay attention to where the shadows sit.
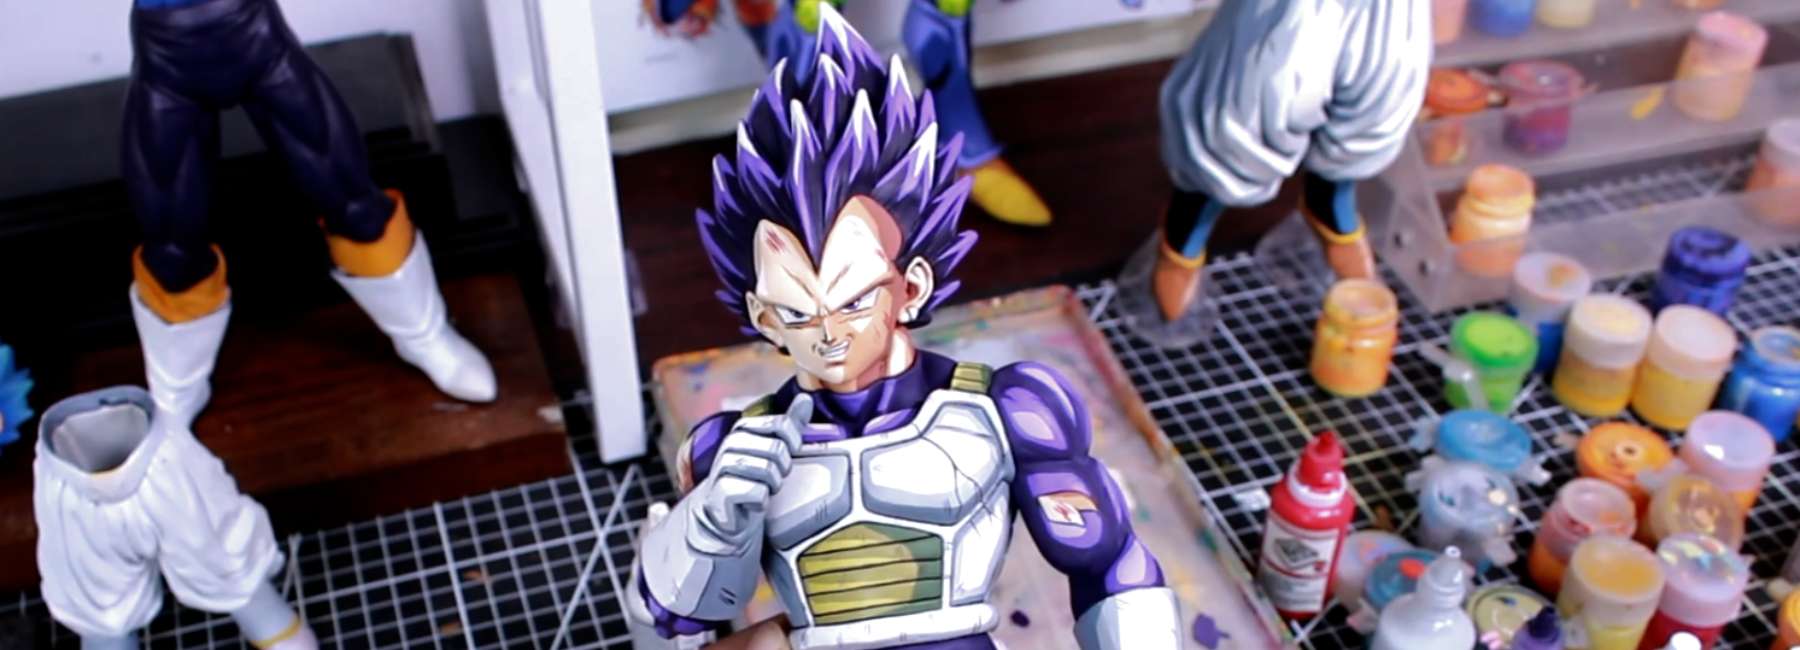
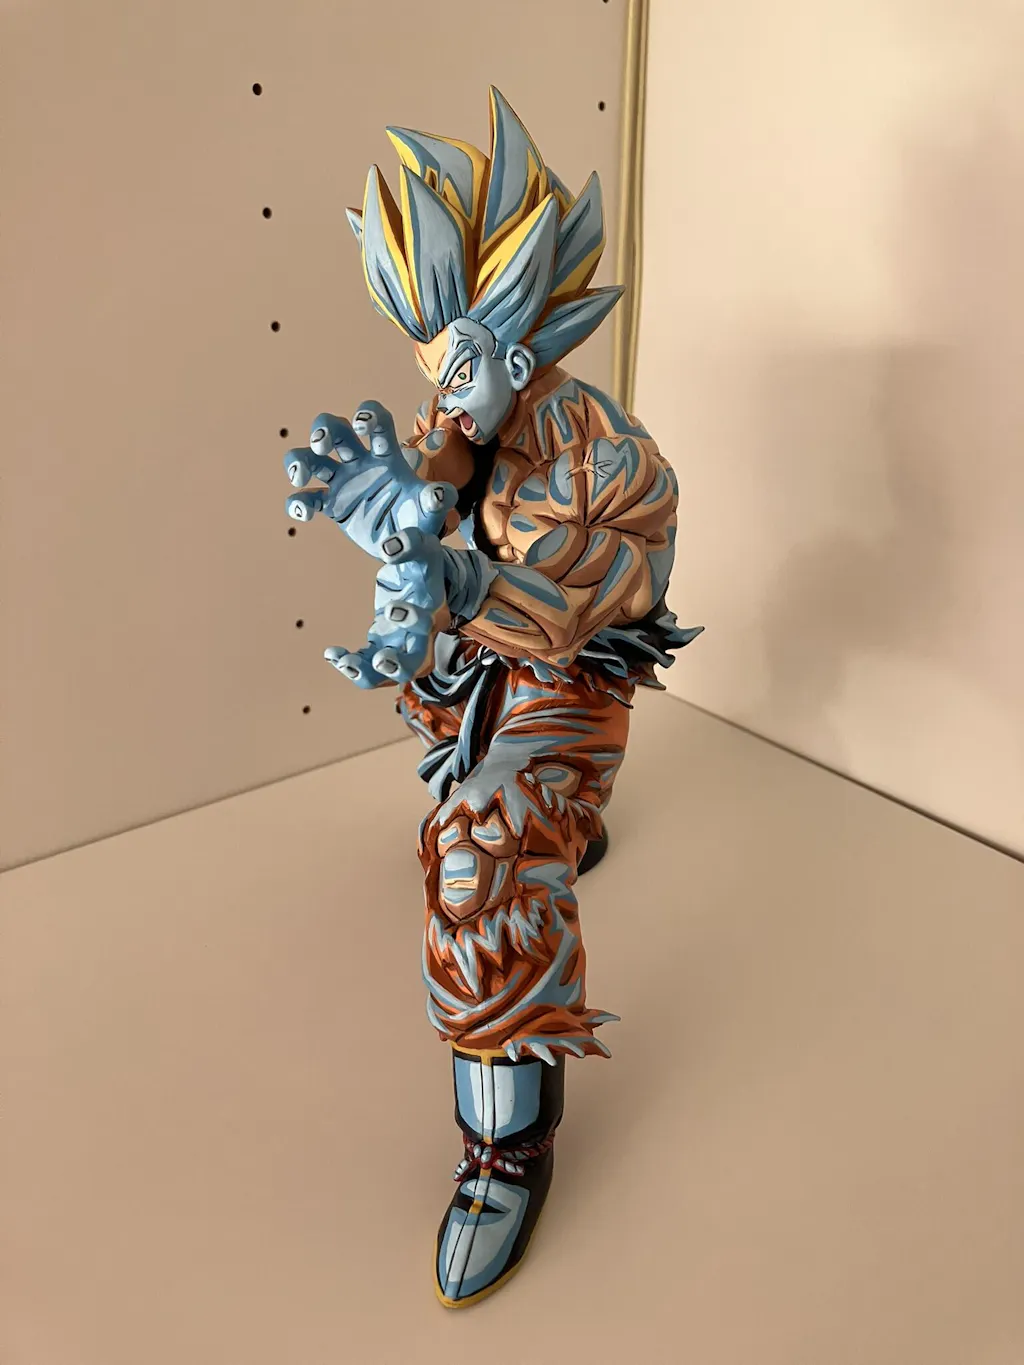
On Vegeta, shadows typically fall under the chin, beneath the chest armour, inside the major muscle groups, along the underside of the arms and legs, and on the lower portion of each hair segment. The anime shows you exactly where to place your cel-shading. Use it.
✅ Step 3: Mix Your Cel-Shading Colours
For each base colour on the figure, mix a darker version that will become the cel-shading shadow. A typical starting ratio is 70% base colour, 30% black or a darker tone of the same colour family. Adjust based on the colour:
- Skin — base skin tone mixed with a small amount of red-brown for warm shadow
- Bodysuit (Vegeta blue or purple) — base mixed with a darker tone of the same colour family, plus a touch of black
- White armour — base mixed with a cool grey, not pure black
- Black hair — pure black or a very dark grey, since you cannot easily make black darker
- Gold details — base gold mixed with brown or dark red-brown for warm metallic shadow
Mix enough of each shadow colour to last the whole session. Running out partway through and mixing fresh creates visible inconsistency.
✅ Step 4: Plan Your Shadow Placement
Before painting, decide exactly where the cel-shading will go on each area. Plan for clean shadow shapes with defined edges.
Typical placements on a Dragon Ball figure include:
- Under the chin, extending down the neck
- Beneath the chest armour, across the upper bodysuit
- Along the underside of arms and forearms
- Across the lower portion of leg muscles
- Along the underside of each hair segment
- Inside the underside of armour overlaps
- Around the inside of joints — armpits, elbows, knees
The shadows should feel logical based on a single overhead light source.
✅ Step 5: Apply the Shadow Shapes
- Load the brush lightly with the shadow paint and wipe excess on the paper towel
- Place the shadow with deliberate, controlled strokes
- Define the edge of the shadow clearly — do not blend it out
- The transition from mid-tone to shadow should be a clean line, not a gradient.
Work in the order of largest shadow areas first, smallest detail shadows last. This builds confidence as the precision required increases.
✅ Step 6: Refine the Shadow Edges
Once the shadow shapes are placed, examine each one carefully. The edge between shadow and mid-tone is where cel-shading lives or dies. Refine any soft or fuzzy edges with a smaller brush, sharpening the transition until it reads cleanly.
This is also the stage to check that the shadow shapes feel deliberate rather than accidental. A cel-shaded shadow should look like it was painted on with intent.
✅ Step 7: Allow Full Drying Time
Wait until all cel-shading is fully dry before any further work on the figure. A drying interval of at least 30 minutes is the minimum. Use that time to plan the next stage — typically edge highlighting.
✅ Step 8: Inspect Under Strong Light
Once dry, examine the figure under your strongest, most neutral light.
A correctly cel-shaded figure should show:
- Clear, defined shadow shapes with sharp edges
- Bold contrast between shadow and mid-tone
- Logical shadow placement consistent with overhead lighting
- No soft or blended transitions
- A visual quality that feels closer to anime than to realistic painting
Any soft edges or weak shadow shapes can be sharpened before moving on.
How to Apply Cel-Shading Cleanly?
Knowing the process is one thing. The physical technique of placing a sharp shadow with control is what determines the final result.
1. Hold the brush like a pen, anchored against the figure
Cel-shading needs precision, and precision comes from steadiness. Hold the brush like a pen and rest your hand against the figure stand or against your other hand for stability. A brush hand floating in mid-air will produce shaky, soft edges. An anchored hand produces clean, deliberate lines.
2. Use the side of the brush tip for shadow placement, the very tip for edges
For laying down the main body of a shadow shape, use the side of the brush tip. It gives controlled coverage without scratching texture into the surface. For sharpening the edge of the shadow, switch to the very point of the brush. This is where precision matters most.
3. Work in confident strokes, not tentative ones
Cel-shading punishes hesitation. Tentative brush strokes leave fuzzy, uncertain edges that ruin the graphic quality of the technique. Plan the stroke before you make it, then execute it confidently. A clean, decisive line will always look better than a careful, hesitant one.
4. Build shadows in two passes, not one
The first pass establishes the shadow shape and placement. The second pass deepens the shadow and sharpens the edge. Two passes give significantly cleaner results than trying to nail the shadow in one go. Apply, let it dry briefly, then return to refine.
5. Leave space for edge highlighting
Cel-shading is followed by edge highlighting in the next stage of the art process. The shadow shapes should not extend all the way to the edges of the figure — leave the sharpest edges and highest points for the highlight stage to claim.
A good rule of thumb in art: shadows occupy the lower half to two-thirds of each surface, mid-tone fills the middle, and the highest edges are reserved for highlighting.
6. Step back regularly
Every few minutes, hold the figure at arm's length and check the shadow placement from a normal viewing distance. Cel-shading is a technique built for display distance, not close inspection. Stepping back regularly catches placement issues that are invisible up close.
Practical tips:
- Keep your anime reference images visible during the session
- Take regular breaks; cel-shading fatigue produces shaky lines
- If a shadow goes wrong, let it dry fully before correcting — wet correction always makes the problem worse
- A slightly damp clean brush can soften an edge if needed, but use this sparingly
What beginners get wrong:
- Trying to make cel-shading look "natural" by softening every edge
- Soft edges defeat the entire point of the technique
- Cel-shading works because the edges are sharp
- If you find yourself blending the shadow out, stop — you are undoing the technique you came here to learn
👉 Learn to Repaint: Figure Painting Course
Examples of Cel-Shading in Practice
Seeing how cel-shading is actually applied to specific areas of a Dragon Ball figure makes the technique significantly easier to understand. The examples below walk through cel-shading decisions for the most common areas of a Vegeta repaint.
Example 1: Cel-Shading Vegeta's Bodysuit
The bodysuit is where cel-shading delivers the biggest visible impact on a Vegeta figure.
- Starting point: Layered Xereus Purple bodysuit with Druchii Violet wash visible in the muscle valleys
- Shadow colour: Xereus Purple mixed with roughly 30% Abaddon Black, producing a deep, cool purple shadow tone.
- Placement: Shadow shapes are painted along the lower portion of the chest muscles, beneath the pectoral overhang, along the underside of the abs, across the lower thigh muscles, and along the underside of each calf. The shadow edge should be a clean line, not a gradient.
RESULT: The bodysuit reads as anime-style anatomy — clear muscle separation, bold shadow shapes, and a graphic quality that captures the source material.
Example 2: Cel-Shading Vegeta's White Armour
White armour is one of the trickiest cel-shading targets because the contrast can easily look harsh.
- Starting point: Layered White Scar armour panels with Drakenhof Nightshade wash in the recesses.
- Shadow colour: White Scar mixed with Dawnstone (a cool grey), producing a soft cool-grey shadow rather than a harsh dark one.
- Placement: Shadow shapes along the underside of each armour panel, along the inner edges where panels overlap, and across the lower portion of the chest plate. Keep the shadow narrow and controlled.
RESULT: The armour gains visible depth and structure without losing its white character. The shadow placement makes the panels feel like solid plate rather than flat painted shapes.
Example 3: Cel-Shading Vegeta's Hair
Hair is one of the most distinctive cel-shading targets because anime hair is drawn with very specific shadow shapes.
- Starting point: Layered black hair with Nuln Oil wash in the segment lines.
- Shadow colour: Pure Abaddon Black, since the hair is already very dark.
- Placement: Shadow shapes painted along the lower half of each hair segment, leaving the upper half as the lighter mid-tone. The shadow edge should follow the curve of each spike or section.
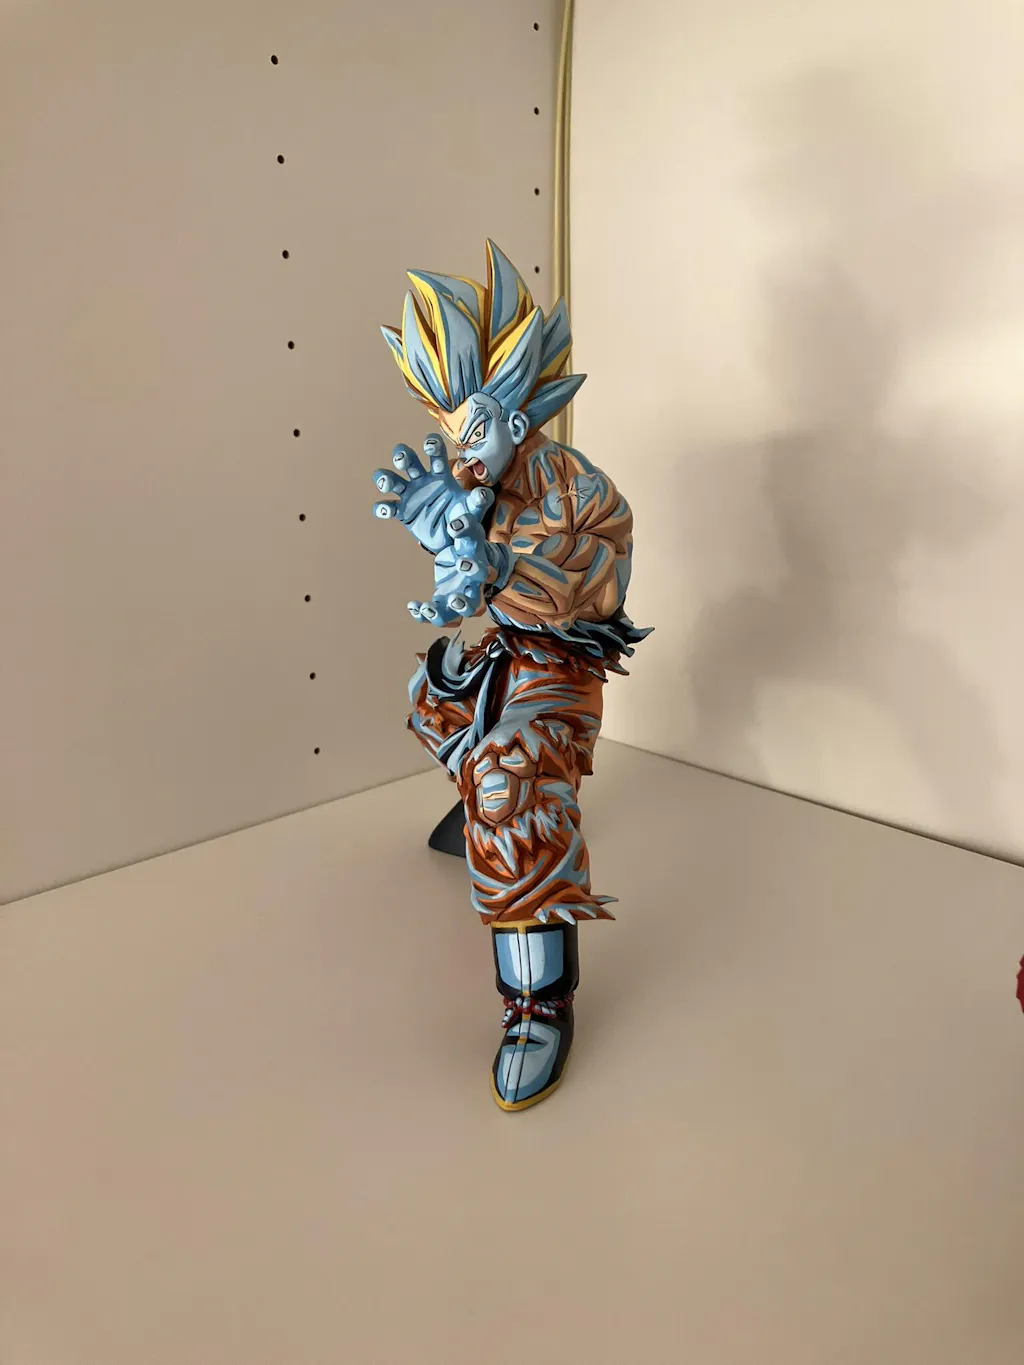
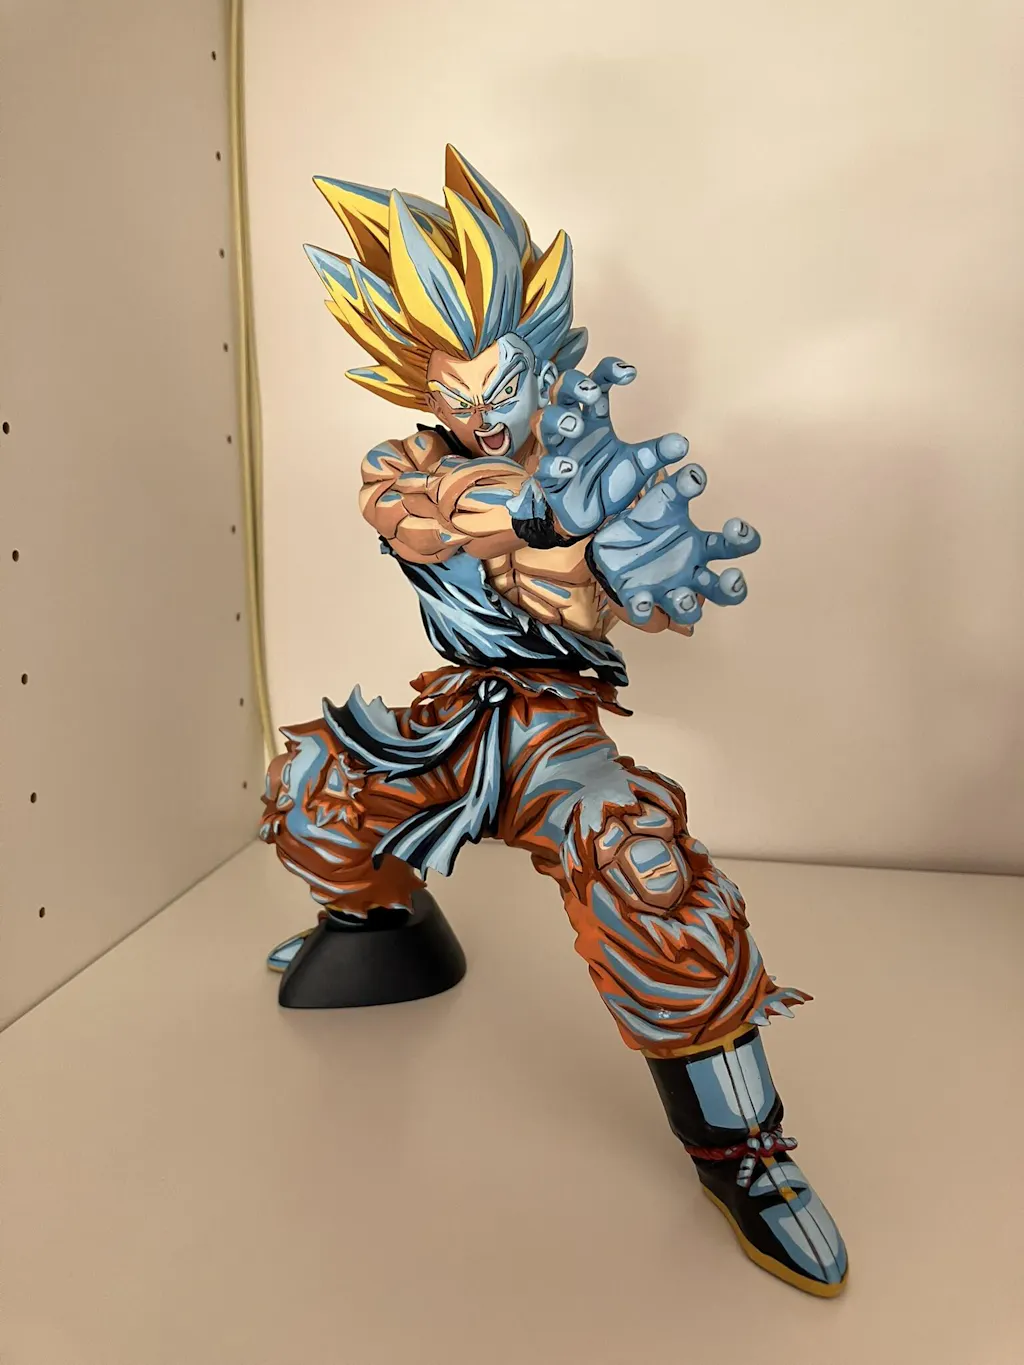
RESULT: The hair gains the segmented, illustrated quality that defines anime hair. Each spike reads clearly, the silhouette sharpens, and the figure starts to feel like a Dragon Ball drawing translated into three dimensions.

Example 4: Cel-Shading Vegeta's Skin
Skin cel-shading is the most subtle work in this stage but also one of the most important for the final result.
- Starting point: Layered skin tone with Reikland Fleshshade wash in the deeper recesses.
- Shadow colour: Base skin tone mixed with a small amount of red-brown, producing a warm shadow rather than a dirty grey one.
- Placement: Shadow shapes beneath the chin, along the side of the neck, in the eye sockets, beneath the cheekbones, and along the underside of the arms. Keep the shapes small and controlled — face shadows in particular should feel subtle but definite.
RESULT: The face gains expressive depth without looking dirty or muddy. The shadow shapes give the character's features definition and prepare the surface for face detailing in the final stages.
Example 5: Cel-Shading Vegeta's Gold Chest Detail
The gold V-piece is small but visually central, and cel-shading gives it the metallic weight it needs.
- Starting point: Layered Retributor Armour gold with Agrax Earthshade wash in the recesses.
- Shadow colour: Retributor Armour mixed with a darker brown — Doombull Brown or similar — for a warm metallic shadow.
- Placement: Shadow shapes along the lower edge of each gold section and along the inner detail lines. Keep the placement tight and controlled.
RESULT: The gold reads as deliberately metallic with sharp edges and visible weight. The cel-shading turns flat gold paint into something that catches the eye.
Common Mistakes to Avoid
❌ Soft, blended shadow edges
- The single biggest mistake
- Soft edges destroy the graphic quality cel-shading is meant to deliver
- Keep transitions sharp
- Resist the instinct to blend
❌ Shadow tone too dark
- Pure black mixed too aggressively into the shadow colour produces shadows that look harsh and disconnected from the rest of the figure
- A 70/30 base-to-darker mix is usually a better starting point than 50/50
❌ Inconsistent shadow placement
- Shadows that fall in different directions on different parts of the figure look chaotic
- Pick a single overhead light source and apply all cel-shading consistently with it in mind
❌ Shadow shapes too small
- Timid, small shadow shapes disappear at display distance
- Cel-shading needs to be bold to read properly
- Make the shadows clearly visible
❌ Skipping the reference
- Painting cel-shading by intuition rather than using anime reference produces shadows that feel arbitrary
- Anime artists have already done the work
- Use their decisions
❌ Cel-shading without first layering
- Cel-shading on top of a flat base coat produces stark, disconnected shadows
- The technique needs the gradient established by layering to work properly
❌ Working in poor lighting
- Shadow placement precision depends entirely on seeing the figure's structure clearly
- Strong, neutral lighting is non-negotiable for this stage
Cel-Shading Different Surface Types
Smooth flat surfaces (armour panels, capes):
Flat surfaces show every cel-shading inconsistency. Use slightly more thinned shadow paint and place the shadow shapes with deliberate strokes along the lower edges. A second pass to sharpen the shadow edge is particularly valuable here.
Muscular surfaces (chest, biceps, thighs):
Muscle surfaces are ideal for cel-shading because the sculpt provides natural shadow placement. Apply shadows along the underside of each muscle group, leaving the top of each muscle as mid-tone. This is one of the surfaces where cel-shading delivers the most dramatic improvement.
Hair sections:
Hair takes cel-shading very well. Apply shadows along the lower half of each segment, keeping the edge crisp. The bold contrast between shadow and mid-tone is what gives anime hair its characteristic look.
Faces and skin:
Face cel-shading is the most demanding work in this stage. Use a size 00 brush and small, controlled shadow shapes. Subtlety matters more here than on the body — face shadows should be visible but not heavy.
Armour and metallic surfaces:
Armour cel-shading targets the underside of each panel and the inside of overlaps. Keep shadow placement tight and controlled. Warm shadow tones (mixed with brown rather than black) usually work better on metallic surfaces than cool ones.
Frequently Asked Questions
What is the difference between cel-shading and washing?
Washing is a wet technique that creates soft shadow through gravity and capillary flow. Cel-shading is a deliberate brush technique that paints sharp, defined shadow shapes on top of the figure. Both add shadow, but they produce very different visual results. Most strong repaints use both.
Do I need to cel-shade every area of the figure?
Most major areas benefit from cel-shading, but very small details may not need it. Focus cel-shading on the areas where the technique delivers the biggest visual impact: bodysuit, hair, armour panels, and skin.
How dark should the cel-shading colour be?
A 70% base / 30% black or darker tone mix is a good starting point. Adjust based on the surface — white armour needs lighter shadow than purple bodysuit, and skin needs a warm shadow rather than a dark one.
Can I cel-shade without first washing?
You can, but the result will look harsher and less integrated. The wash provides a soft underlayer that the cel-shading sits on top of cleanly. Skipping the wash makes the cel-shading look disconnected from the rest of the figure.
How long does cel-shading take for a full figure?
For a mid-size Dragon Ball figure, full cel-shading typically takes between three and five hours across multiple sessions. The technique rewards patience and produces noticeably worse results when rushed.
Will cel-shading look too cartoonish in person?
Rarely. Cel-shading that looks "too obvious" close up almost always looks just right at display distance. The classic technique is calibrated for normal viewing, not extreme close-up inspection.
What if the cel-shading looks wrong after I apply it?
Let it dry fully, then assess the issue. Most problems can be corrected with a second targeted pass — either deepening shadows that are too weak or adding mid-tone over shadows that went too far. Wet correction almost always makes things worse.
Conclusion: Figure Cel-Shading
Figure cel-shading is the technique that finally makes a repaint look like the anime it came from. It is not a subtle technique. It is bold, deliberate, and graphic — and that is exactly what anime characters are designed to look like. Soft shading flattens the source material. Cel-shading respects it.
The technique itself is not difficult. It rewards patience, controlled application, sharp brush work, and the discipline to keep edges crisp rather than blending them out. Two careful passes, with reference images visible throughout, produce shadow shapes that read clearly from across a room and bring the character's energy to the figure.

Share:
Step-by-Step Figure Layering Guide for Beginner Painters
Step-by-Step Figure Edge Highlighting Guide for Beginner Artists