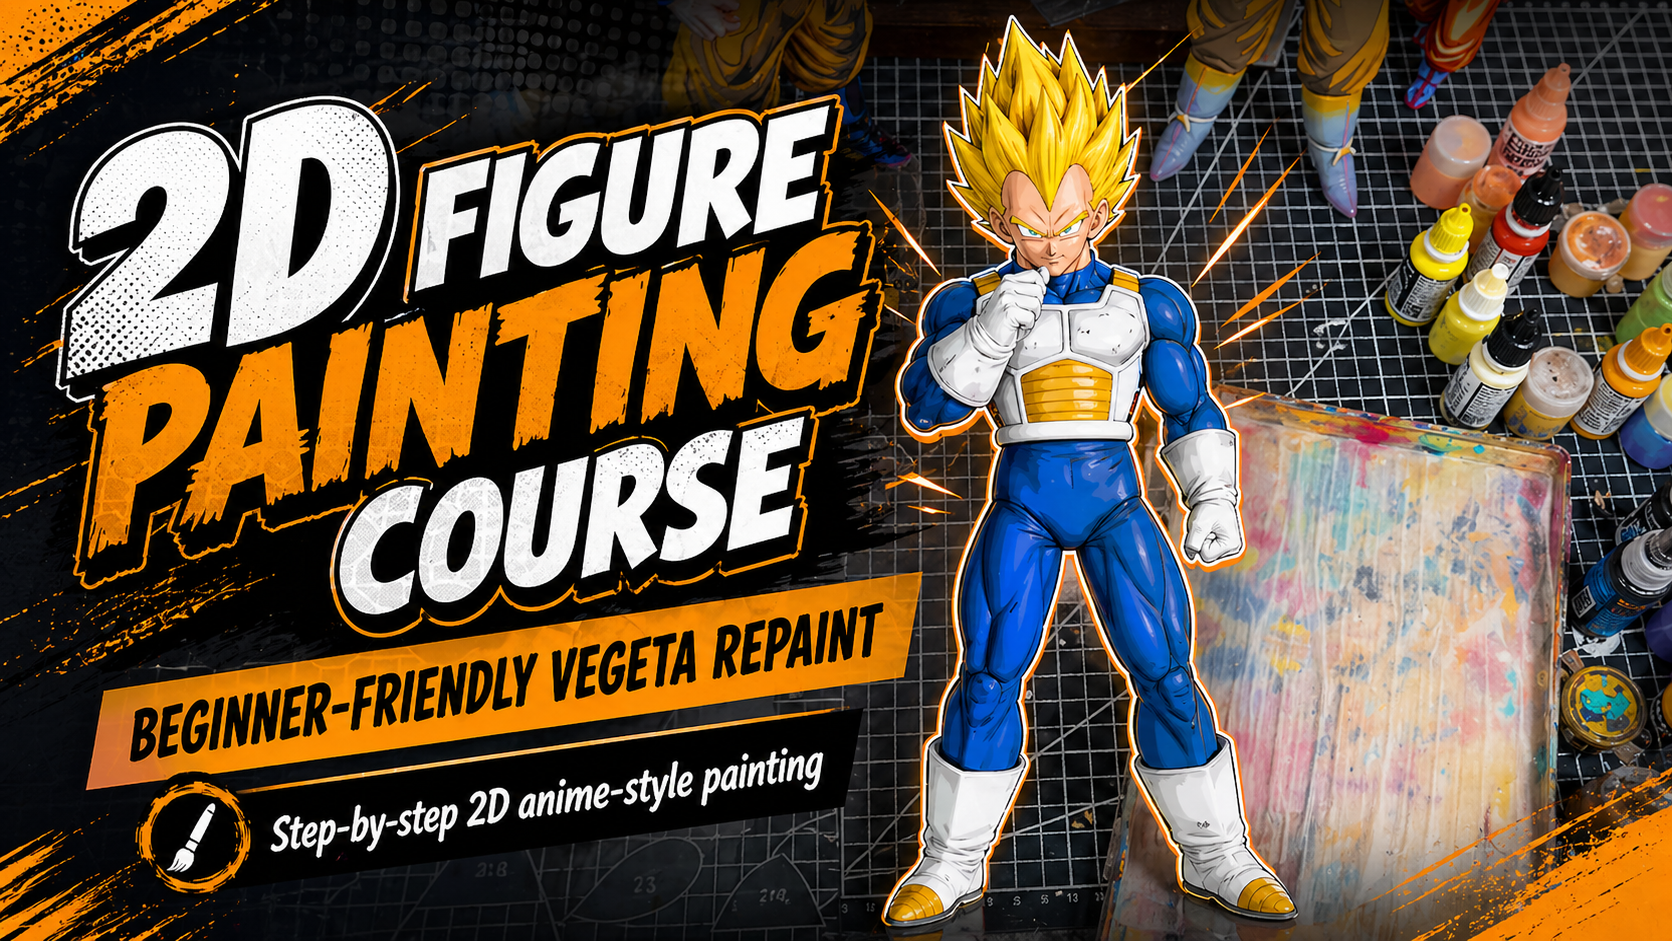
Vegeta is one of the most painted characters in the Dragon Ball collector space, and one of the most often painted badly. The reason is that Vegeta is unforgiving. His colour palette has no margin for error, demonstrating the value of precision in art. His armour panels demand clean edges.
His expression has to carry that signature intensity or the whole figure falls flat. Goku is forgiving — a slightly off Goku still reads as Goku because the warmth of the character carries through. A slightly off Vegeta reads as someone cosplaying Vegeta.
This workshop is built around that challenge, encouraging students to refine their artistic skills. It is not a generic painting tutorial dressed up with a Vegeta photo. It is a workshop-style breakdown of the exact decisions, mixes, and brush moves that produce a Vegeta repaint worth displaying.
Table of Contents:
- Why Vegeta is harder to repaint than most Dragon Ball characters?
- What you need before the workshop begins?
- The Vegeta-specific colour map
- Workshop stage 1: Reading the figure
- Workshop stage 2: Painting the bodysuit
- Workshop stage 3: Tackling the white armour
- Workshop stage 4: Hair, gloves, boots
- Workshop stage 5: The face that defines the figure
- Workshop stage 6: Final sealing and display
- Common Vegeta repaint mistakes
- Frequently asked questions
Why Vegeta Is Harder to Repaint?
Vegeta has four specific challenges that make him harder than the average Dragon Ball figure.
1. The white armour shows everything
- Pure white is the least forgiving colour in figure painting
- Every brush stroke, every uneven coat, every patchy area shows immediately
- Goku's orange gi forgives weak technique. Vegeta's armour does not
2. The bodysuit muscle definition is heavily sculpted
- Most Vegeta figures have aggressive muscle sculpting on the chest, arms, and legs
- That sculpting is a gift if you handle it deliberately and a liability if you flood it with thick paint
- Every stage from priming to highlighting has to respect the sculpt
3. The expression is half the character
- Vegeta without his sharp brow, narrowed eyes, and confident smirk is just a small angry man in armour
- Goku's openness comes through even with average face work
- Vegeta's intensity has to be earned through deliberate detailing
4. The colour palette is small and specific
- A Vegeta repaint uses roughly six core colours
- There is nowhere to hide weak mixing
- Every shade has to land specifically
These four points shape every decision in this workshop. They are the difference between a repaint that captures the Prince of Saiyans and one that almost does.

What You Need Before the Workshop Begins?
This workshop assumes you already have basic figure painting tools — brushes, primer, varnish, a wet palette, and a clean workspace.
For Vegeta specifically, the additional requirements are:
- A Vegeta figure with clear sculpted detail on the armour and bodysuit
- Reference images from the anime — ideally screenshots from the Saiyan Saga and Cell Saga for colour accuracy
- A specific colour set covering the six core Vegeta tones (full breakdown below)
- Patience for the face stage in particular
The figure size matters more than people expect. A 25cm-plus Vegeta gives you room to work the face properly and shows your effort clearly. A 15cm Vegeta will punish every shaky brush stroke and give you almost no margin on the eyes.
The Vegeta-Specific Colour Map
Before any paint touches the figure, the colour decisions need to be made. Vegeta is consistent across most of his appearances in the anime, which means there is a near-universal palette that works.
Saiyan Saga / Battle armour Vegeta:
- Bodysuit — deep blue (Vallejo Prussian Blue, Citadel Kantor Blue)
- Armour — pure white with cool grey shadows (Vallejo White, Citadel White Scar)
- Boots and gloves — pure white matching the armour
- Hair — black with cool grey highlights (Citadel Abaddon Black)
- Gold chest piece and shoulder trim — metallic gold (Citadel Retributor Armour)
- Skin — Saiyan tan (Vallejo Light Flesh shifted slightly warmer)
Namek / Frieza Saga Vegeta:
- Bodysuit — black or very dark blue
- Armour — pure white with the same cool grey shadows
- Gold trim — slightly more aggressive metallic finish
Cell Saga / Buu Saga Vegeta:
- Bodysuit — royal blue with stronger purple undertones
- Armour — white but often with sharper, more deliberate edge work
- Gold — Royal Family chest emblem becomes more prominent, showcasing the value of detail in art.
The version you paint depends on the figure you have. Most modern Vegeta sculpts default to the Saiyan or Cell Saga look. Pick one version and commit to it — mixing eras produces visual confusion.
Workshop Stage 1: Reading the Figure
Before priming, the figure needs to be read carefully. This is the stage most beginners skip. They unbox, clean, and prime without ever spending time understanding what the sculpt is offering them.
Spend 2-3 minutes looking at the figure.
Identify where the muscle peaks sit. Note where the armour edges are sharpest. Find the recesses that will catch your wash. Look for any sink marks or seam lines that need cleaning before priming.
For Vegeta specifically, study:
- The chest plate — where it meets the bodysuit and where its top edge catches the light
- The shoulder pads — sharp upper edges that will need clean highlights
- The hair segmentation — count the spikes and note which are highest
- The brow ridge — this controls the entire facial expression
- The boot edges — where the white meets the bodysuit, and where the boots meet the floor
Reading the figure first means you start every later stage with intention rather than reaction. You know what you are aiming for before the brush touches the surface.

Workshop Stage 2: Painting the Bodysuit
The bodysuit is the largest single area on the figure and often the area where beginners produce their weakest results. The challenge is the muscle sculpting. Heavy sculpting punishes thick paint and rewards careful layering.
Step-by-step:
- Prime in dark grey or black. Vegeta's bodysuit is dark, and a dark primer gives the colour the depth it needs.
- Apply the bodysuit base coat in thin layers. Two or three thin coats of Prussian Blue or Kantor Blue, working from the centre of each muscle group outward. Do not let the paint flood into the muscle valleys.
- Apply the wash. Druchii Violet or a custom dark blue wash flows into the muscle valleys, the chest pectoral split, the abs, and the inner thigh recesses.
- Layer back to clean colour. The original blue, applied to the top of each muscle group only, leaving the wash visible in the valleys.
- Cel-shade the shadow shapes. A darker mix of the base blue, applied with sharp edges along the underside of each muscle group. This is what gives the bodysuit its anime quality.
- Edge highlight the muscle peaks. A lighter blue mixed with a touch of white, applied along the very top ridge of each muscle group.

Workshop Stage 3: Tackling the White Armour
This is the stage that intimidates most beginners. White armour shows everything. The trick is not to fear the white. The trick is to handle it methodically.
Step-by-step:
- Prime in white or very light grey. A dark primer makes white nearly impossible to cover cleanly.
- Apply the white base coat in three thin coats. Vallejo White or Citadel White Scar, building gradually. Do not try to cover in one heavy pass.
- Apply a cool grey wash. Drakenhof Nightshade thinned with water, applied carefully along the armour edges, the underside of each panel, and where the panels meet the bodysuit. Clean any pooled wash from flat surfaces immediately.
- Layer back to clean white. White Scar applied to the top-facing surface of each armour panel, leaving the wash visible along edges and joins.
- Cel-shade with cool grey. Dawnstone or a similar cool grey, applied along the underside of each armour panel with sharp edges. This gives the armour its weight and sense of solid plate.
- Edge highlight with pure white. White Scar applied to the sharpest corners and the top edges of each panel.
The cool grey shadow is critical. Pure black shadow on white armour looks harsh and disconnected. Cool grey integrates the shadow with the rest of the figure.

Workshop Stage 4: Hair, Gloves, Boots
After the bodysuit and armour are complete, the secondary elements come next, which look as follows.
✨ Figure Hair
Vegeta's iconic hair is the most distinctive element of the figure after the face. The segmented sculpt gives you natural shadow placement.
- Base coat: Abaddon Black
- Wash: Nuln Oil flowing into the segment lines
- Layer: A dark grey applied along the top of each spike
- Highlight: A lighter grey at the very tip of each spike
Avoid the temptation to go too light on the hair highlights. Vegeta's hair reads as black with subtle catchlights, not grey with black valleys.
✨ Figure Gloves & Boots
Both are pure white, treated like the armour. Cool grey shadows along the underside, white layered back on the top surfaces, sharp white edge highlights at the corners.
The boot soles can be painted with a slightly darker grey to suggest contact with the ground.
✨ Figure Gold Chest Piece
- Base coat: Retributor Armour
- Wash: Agrax Earthshade flowing into the recesses
- Layer: Retributor Armour back to clean gold on raised areas
- Highlight: Liberator Gold or a brighter metallic on the sharpest edges
Gold reads as gold when there is clear contrast between the wash and the highlight. Skip the wash and the gold reads as flat yellow.

Workshop Stage 5: The Face That Defines the Figure
This is the stage that determines whether the entire repaint works or fails. Strong face work saves a figure with weaker body work. Weak face work ruins a figure regardless of how strong the body looks. Vegeta's face has four critical elements.
✨ The Eyes
- White sclera filling the eye socket cleanly
- Iris — typically a dark blue-grey or near-black depending on the version, leaving thin white edges
- Pupil placed slightly upward for that intense, narrowed expression
- Confident black eye outline along the upper lid, slightly thicker than for a softer character
- Tiny white specular highlight in the upper iris
✨ The Eyebrows
This is where most weak Vegeta repaints fail. The brow has to be sharp, angled, and bold. The inner ends sit slightly lower than the outer ends, creating that signature stern downturn. Use an ultra-fine detail brush and pure black or very dark brown. Sharp edges, single confident strokes.
✨ The Mouth
Vegeta rarely smiles in the anime, and almost never on a figure. The mouth line is thin, slightly downturned at the corners, and painted with a slightly darker skin tone or warm brown.
For figures showing a smirk or shout, the mouth shape changes accordingly, but the colour treatment stays the same.
✨ Skin Highlights
Subtle work on the bridge of the nose, the tops of the cheekbones, the chin tip, and the centre of the forehead. These should be barely visible up close but visible at display distance.

Workshop Stage 6: Final Sealing and Display
Sealing Vegeta
- Matte varnish across the entire figure as the primary seal is a technique every young artist should master
- Gloss varnish applied with a small brush specifically to the eyes, giving them that wet, alive quality
- Optional satin varnish on the boots and armour if you want subtle sheen rather than full matte
Apply the matte varnish in light coats with the can warmed slightly and shaken thoroughly. Two or three thin coats produce significantly better results than one heavy coat.
Once sealed, allow the figure to cure for 48-72 hours before reassembling any moveable parts. Forcing joints back together while varnish is still soft is the most common cause of paint chipping at contact points.
Display Considerations
- Vegeta looks strongest displayed at slightly above eye level
- The angle works with his stern downturned brow rather than against it
- Lighting from above and slightly to the front emphasises the cel-shading and edge highlights
A clean black or dark grey display backdrop reads particularly well behind a white-armoured Vegeta. Bright or busy idea backgrounds compete with the figure's high-contrast palette.
Common Vegeta Repaint Mistakes
❌ Pure black shadows on the white armour
- Black shadows look harsh and disconnected on the material
- Cool grey integrates the shadow with the rest of the figure
- This is the single most common Vegeta repaint mistake
❌ Weak eyebrows
- A timid brow ruins the Vegeta expression entirely, emphasizing the importance of confidence
- The brow has to be sharp, angled, and confident
- If your brow looks soft or fuzzy, the whole face suffers
❌ Over-highlighted hair
- Vegeta's hair is black, not grey
- Strong highlights read as wrong on a Vegeta where they would look fine on a Super Saiyan
- Keep the highlights subtle
❌ Centred pupils
- Slightly upward pupils give the intense, narrowed expression Vegeta is known for
- Centred pupils make him look open and relaxed — the wrong character
❌ Skipping the gold wash
- Flat gold paint reads as yellow
- Gold needs the contrast between the deep wash and the bright highlight to actually look metallic
❌ Painting all the white the same
- The armour, gloves, and boots are all white but they need slightly different treatment
- The armour is structured plate
- The gloves are smoother
- The boots are heavier
- Treat them with the same colour but different shadow placement
❌ Rushing the face
- Spending six hours on the body and 30 minutes on the face produces a figure that looks weaker than spending five hours on the body and 90 minutes on the face
- The face deserves disproportionate time
Frequently Asked Questions
Which Vegeta figure is the best to start with?
A mid-size Vegeta (25-30cm) with clear sculpted muscle definition and minimal movable joints. Banpresto's mainline Vegeta releases tend to be solid starting points — affordable, well-sculpted, and forgiving for first repaints. Avoid your most expensive grail figure for your first attempt. Mistakes happen, and they happen most on first tries.
How long does a full Vegeta repaint take?
For a beginner working through every stage carefully, 30+ hours across multiple sessions is realistic. Experienced painters working in a focused environment can complete a Vegeta in 3-5 days, but the time is part of what makes the result worth displaying.
Do I need an airbrush for Vegeta's white armour?
No. Hand-brushed white armour produces excellent results when the technique is sound — thinned paint, multiple thin coats, and patient cleanup of any pooled paint. An airbrush smooths the process for large flat panels but is not required.
Which Vegeta version is easiest to paint?
The Saiyan Saga / Battle armour version is generally the most accessible. The colour palette is well-documented, the look is iconic, and most figure sculpts default to this design. Super Saiyan and transformation Vegetas add complexity through hair colour transitions and aura effects.
Can I follow this workshop without doing the prep stages first?
Not really. Skipping figure preparation, cleaning, or priming compounds problems through every later stage. The workshop assumes you have a properly prepped figure ready to paint. For full coverage of preparation, our zenithal priming guide covers the foundational work.
What is the single highest-impact technique for a Vegeta repaint?
Cel-shading on the bodysuit. The blue suit is the largest area on the figure, and cel-shading is what makes the muscle definition read as anime-style anatomy rather than flat colour. Strong cel-shading on the bodysuit elevates the entire figure proportion, even if other stages are imperfect.
Is there a structured course that walks through a full Vegeta repaint?
Yes. Our 2D Figure Painting Course is built around a complete Vegeta repaint, broken into 12 chapters covering every stage from preparation through to final reveal. It is the most direct path from starting Vegeta to finishing him properly.
Conclusion: Figure Painting Course Approach
Painting Vegeta well is not about being a more talented painter than someone else. It is about learning and respecting what makes Vegeta specifically Vegeta. The white armour demands patience. The bodysuit demands clean cel-shading. The hair demands subtle highlights.
The face demands sharp, confident detail work. Approach each stage with character intention, and the figure starts to feel like the Prince of Saiyans rather than a generic painted figure.
The techniques are not exotic. Every stage in this workshop draws on standard figure painting fundamentals — base coating, washing, layering, cel-shading, edge highlighting, face detailing. What changes is how those techniques get applied specifically to Vegeta.
For collectors who want a finished Vegeta pose without painting it themselves, our Vegeta collection features completed pieces produced using the same workshop method covered in this academy.
Share:
Which Repainting Anime Figure Studio & Artist Is the Best?
Why Are Anime Figures Hand Painted?